

8mu v1 Manual and Support
Documentation
Build Guide ←
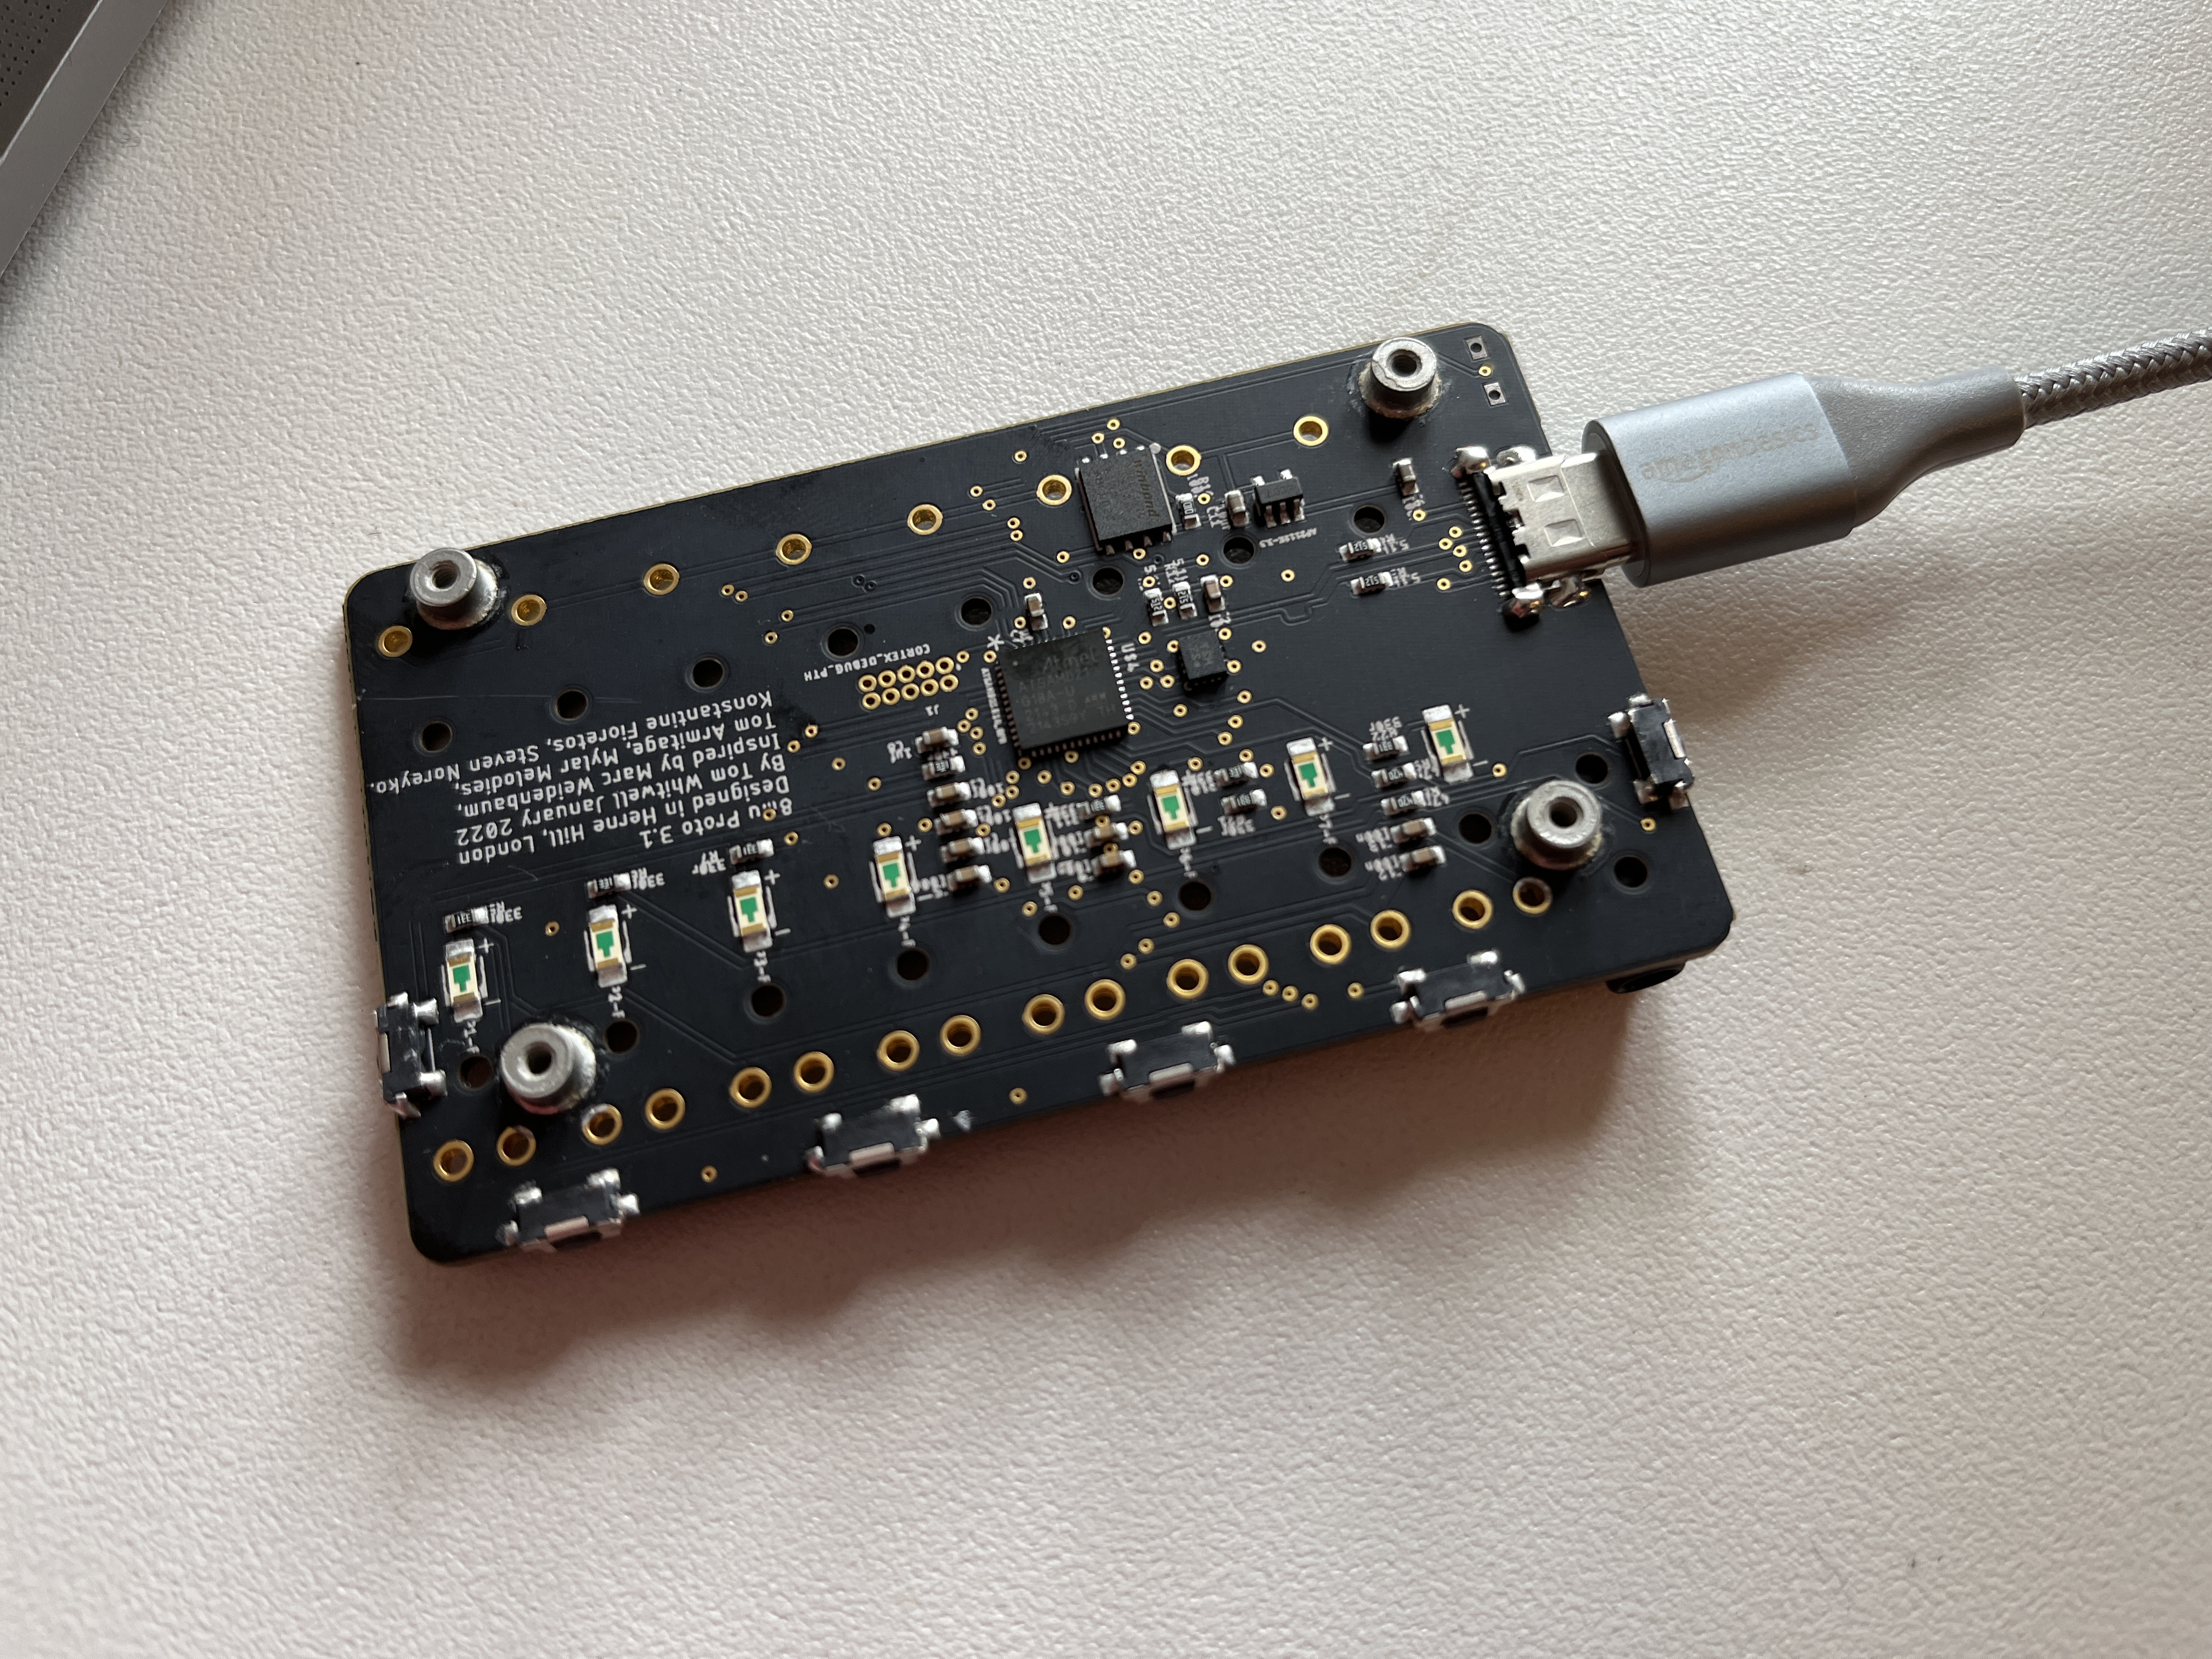
1. Check the board firmware ←
- The boards come with firmware pre-loaded. Let’s just check that everything is working, before we do anything else.
- Connect the bare board to a computer with USB cable - ensure it’s a data cable, not just a power cable.
- On first power up, the device writes default files - this takes a couple of seconds, while rhythmic changing random LEDs are displayed on the screen. This might happen at the factory while the firmware is being installed, so don’t worry if you don’t see it.
- After that, you should see random blinking leds - try running your fingers across the gold circular holes next to the switches, and you should see flickering LEDs as your fingers move. In the 8mu, the LED glows when you move a fader. With no faders in place, this is random noise, likely to change when you touch the bare contacts.
- Then launch the 8mu editor - you should be able to see the config screen, and see the bars on the right move as you move the board.
- If either step fails, read the troubleshooting notes below and contact Thonk support for help.
- If the board looks OK, move on to assembly.
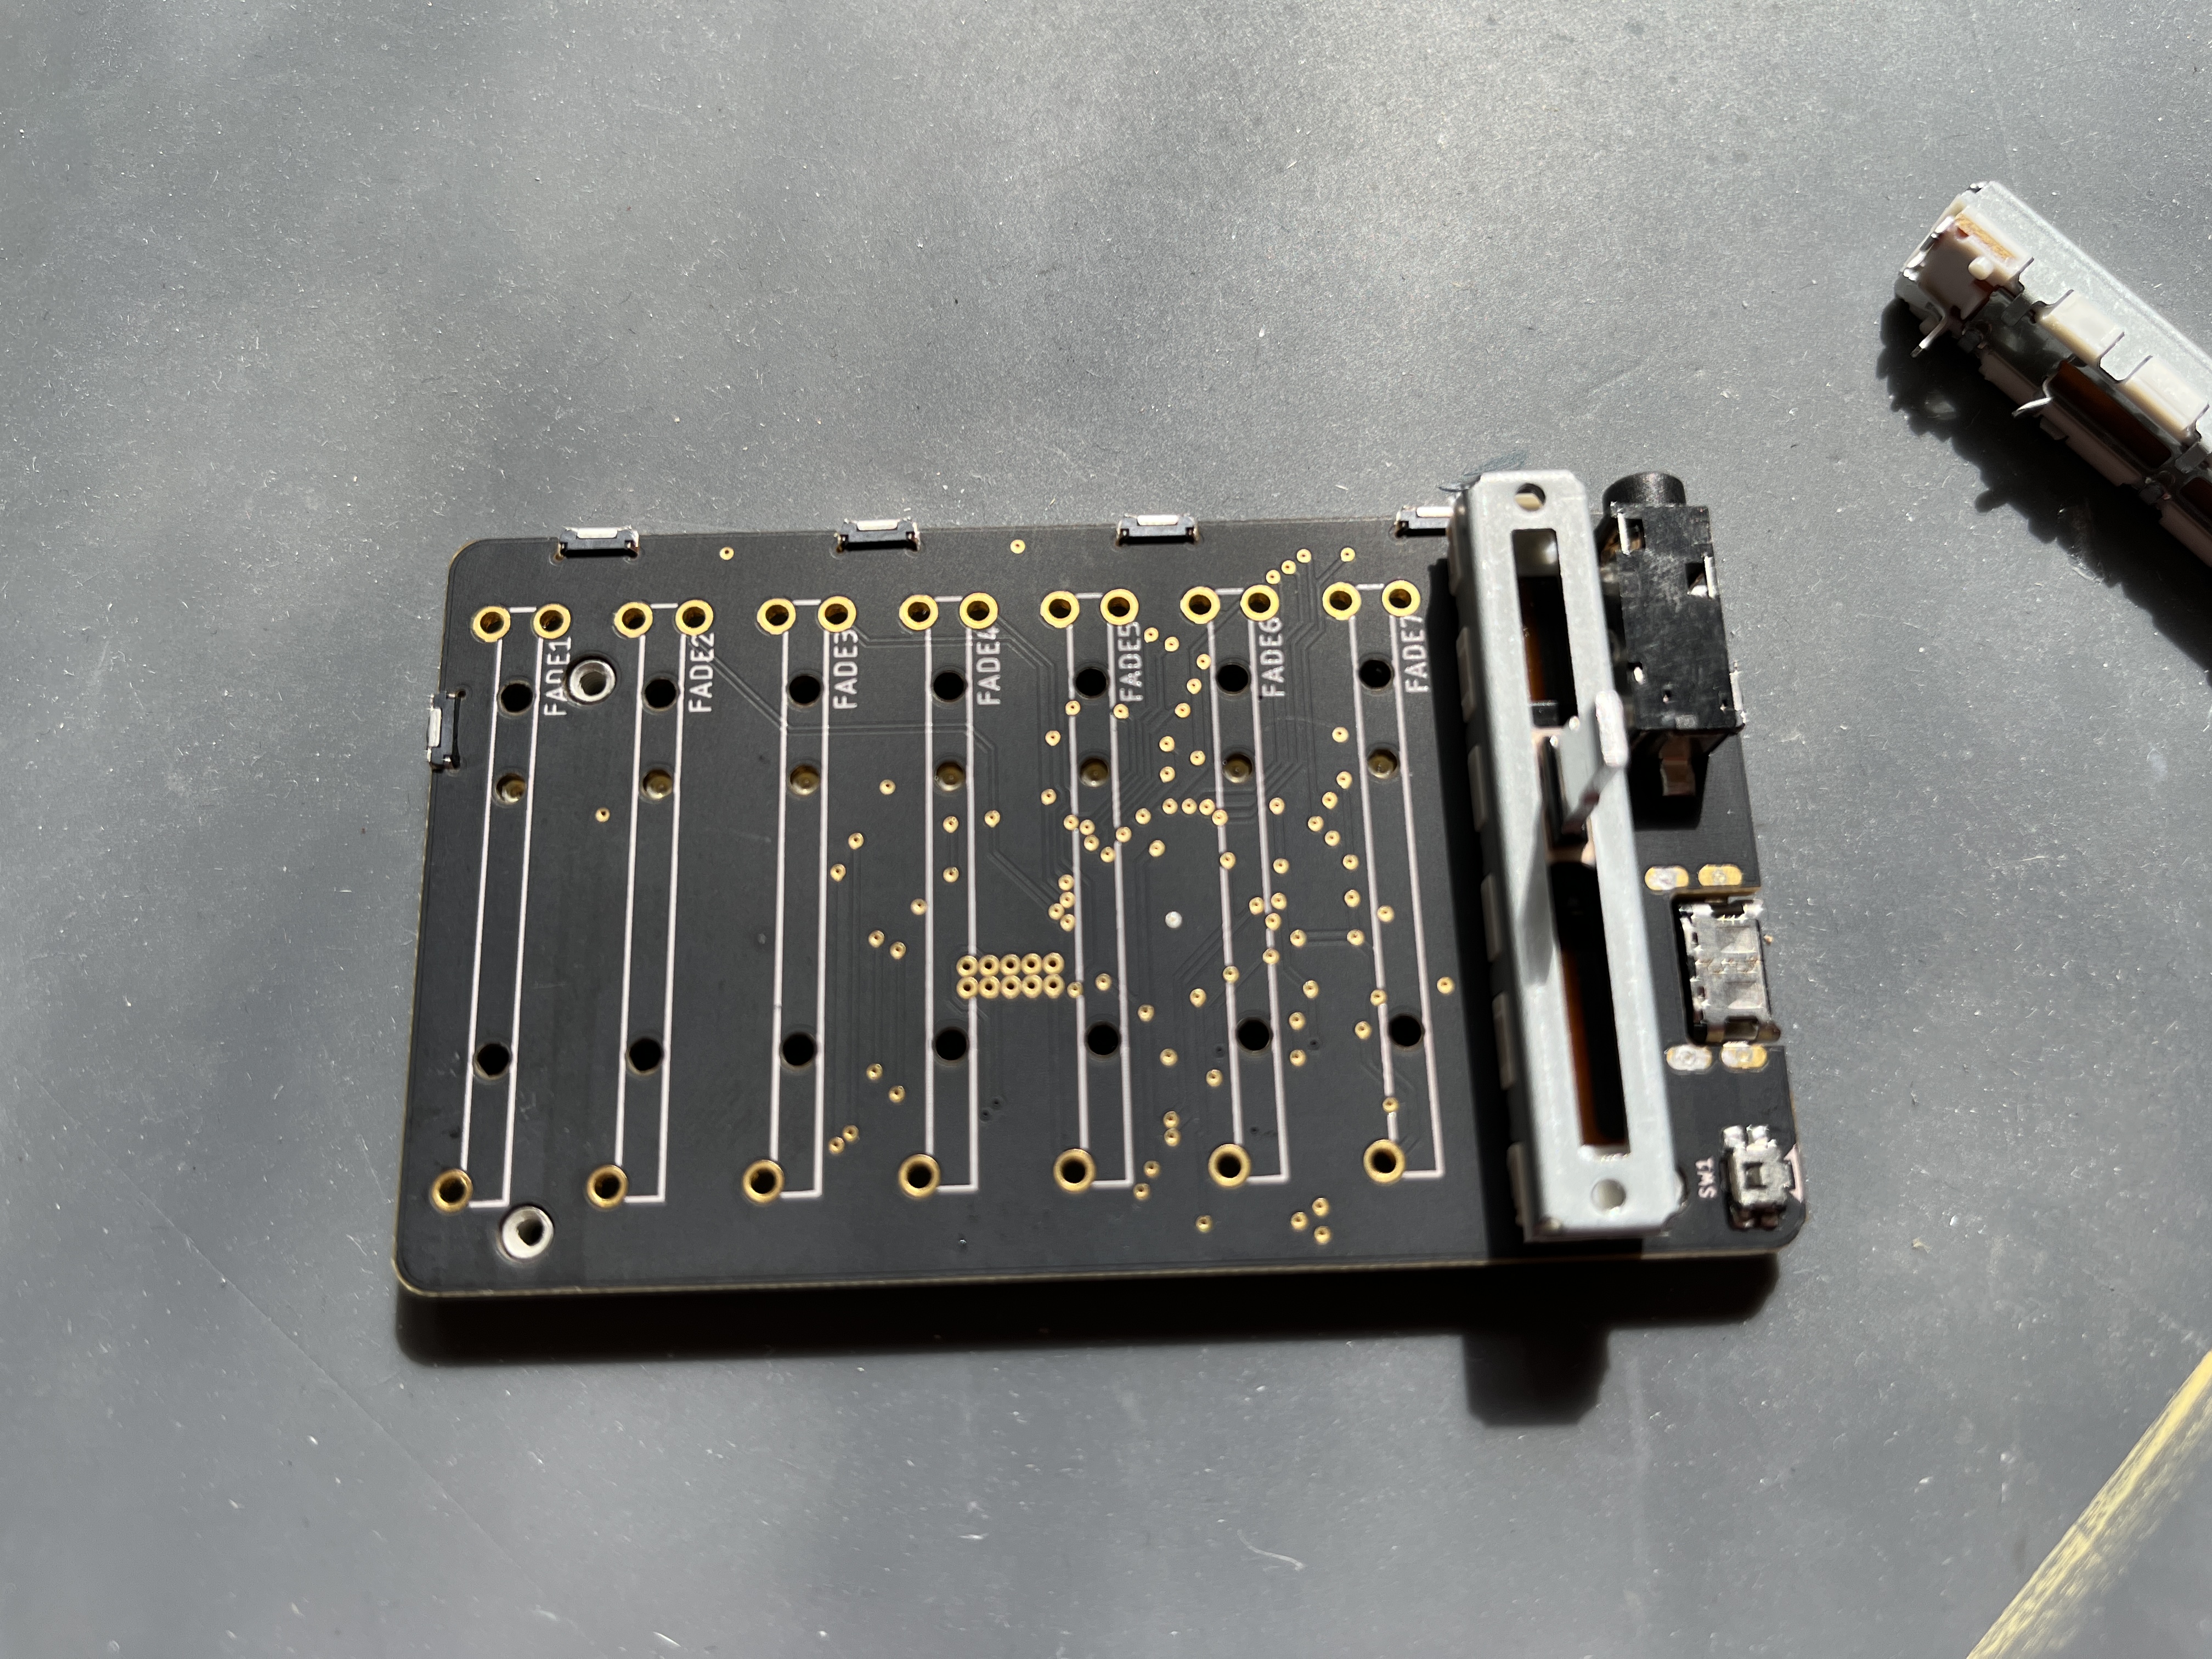
2. Start putting it together ←
- Assembly is pretty straightforward: Soldering on 8 faders, then screwing on the front and back panels
- If you’ve never soldered before here are some links and videos to get you started
- Still, take it slow, ensure everything is mechanically lined up before you solder anything in place.
- NB: your board will not have all the little gold dots seen in the photos - they were just a prototyping error.
- IMPORTANT: The faders go on the top of the board, next to the 3.5mm MIDI socket. Most of the small components and chips are on the bottom of the board.
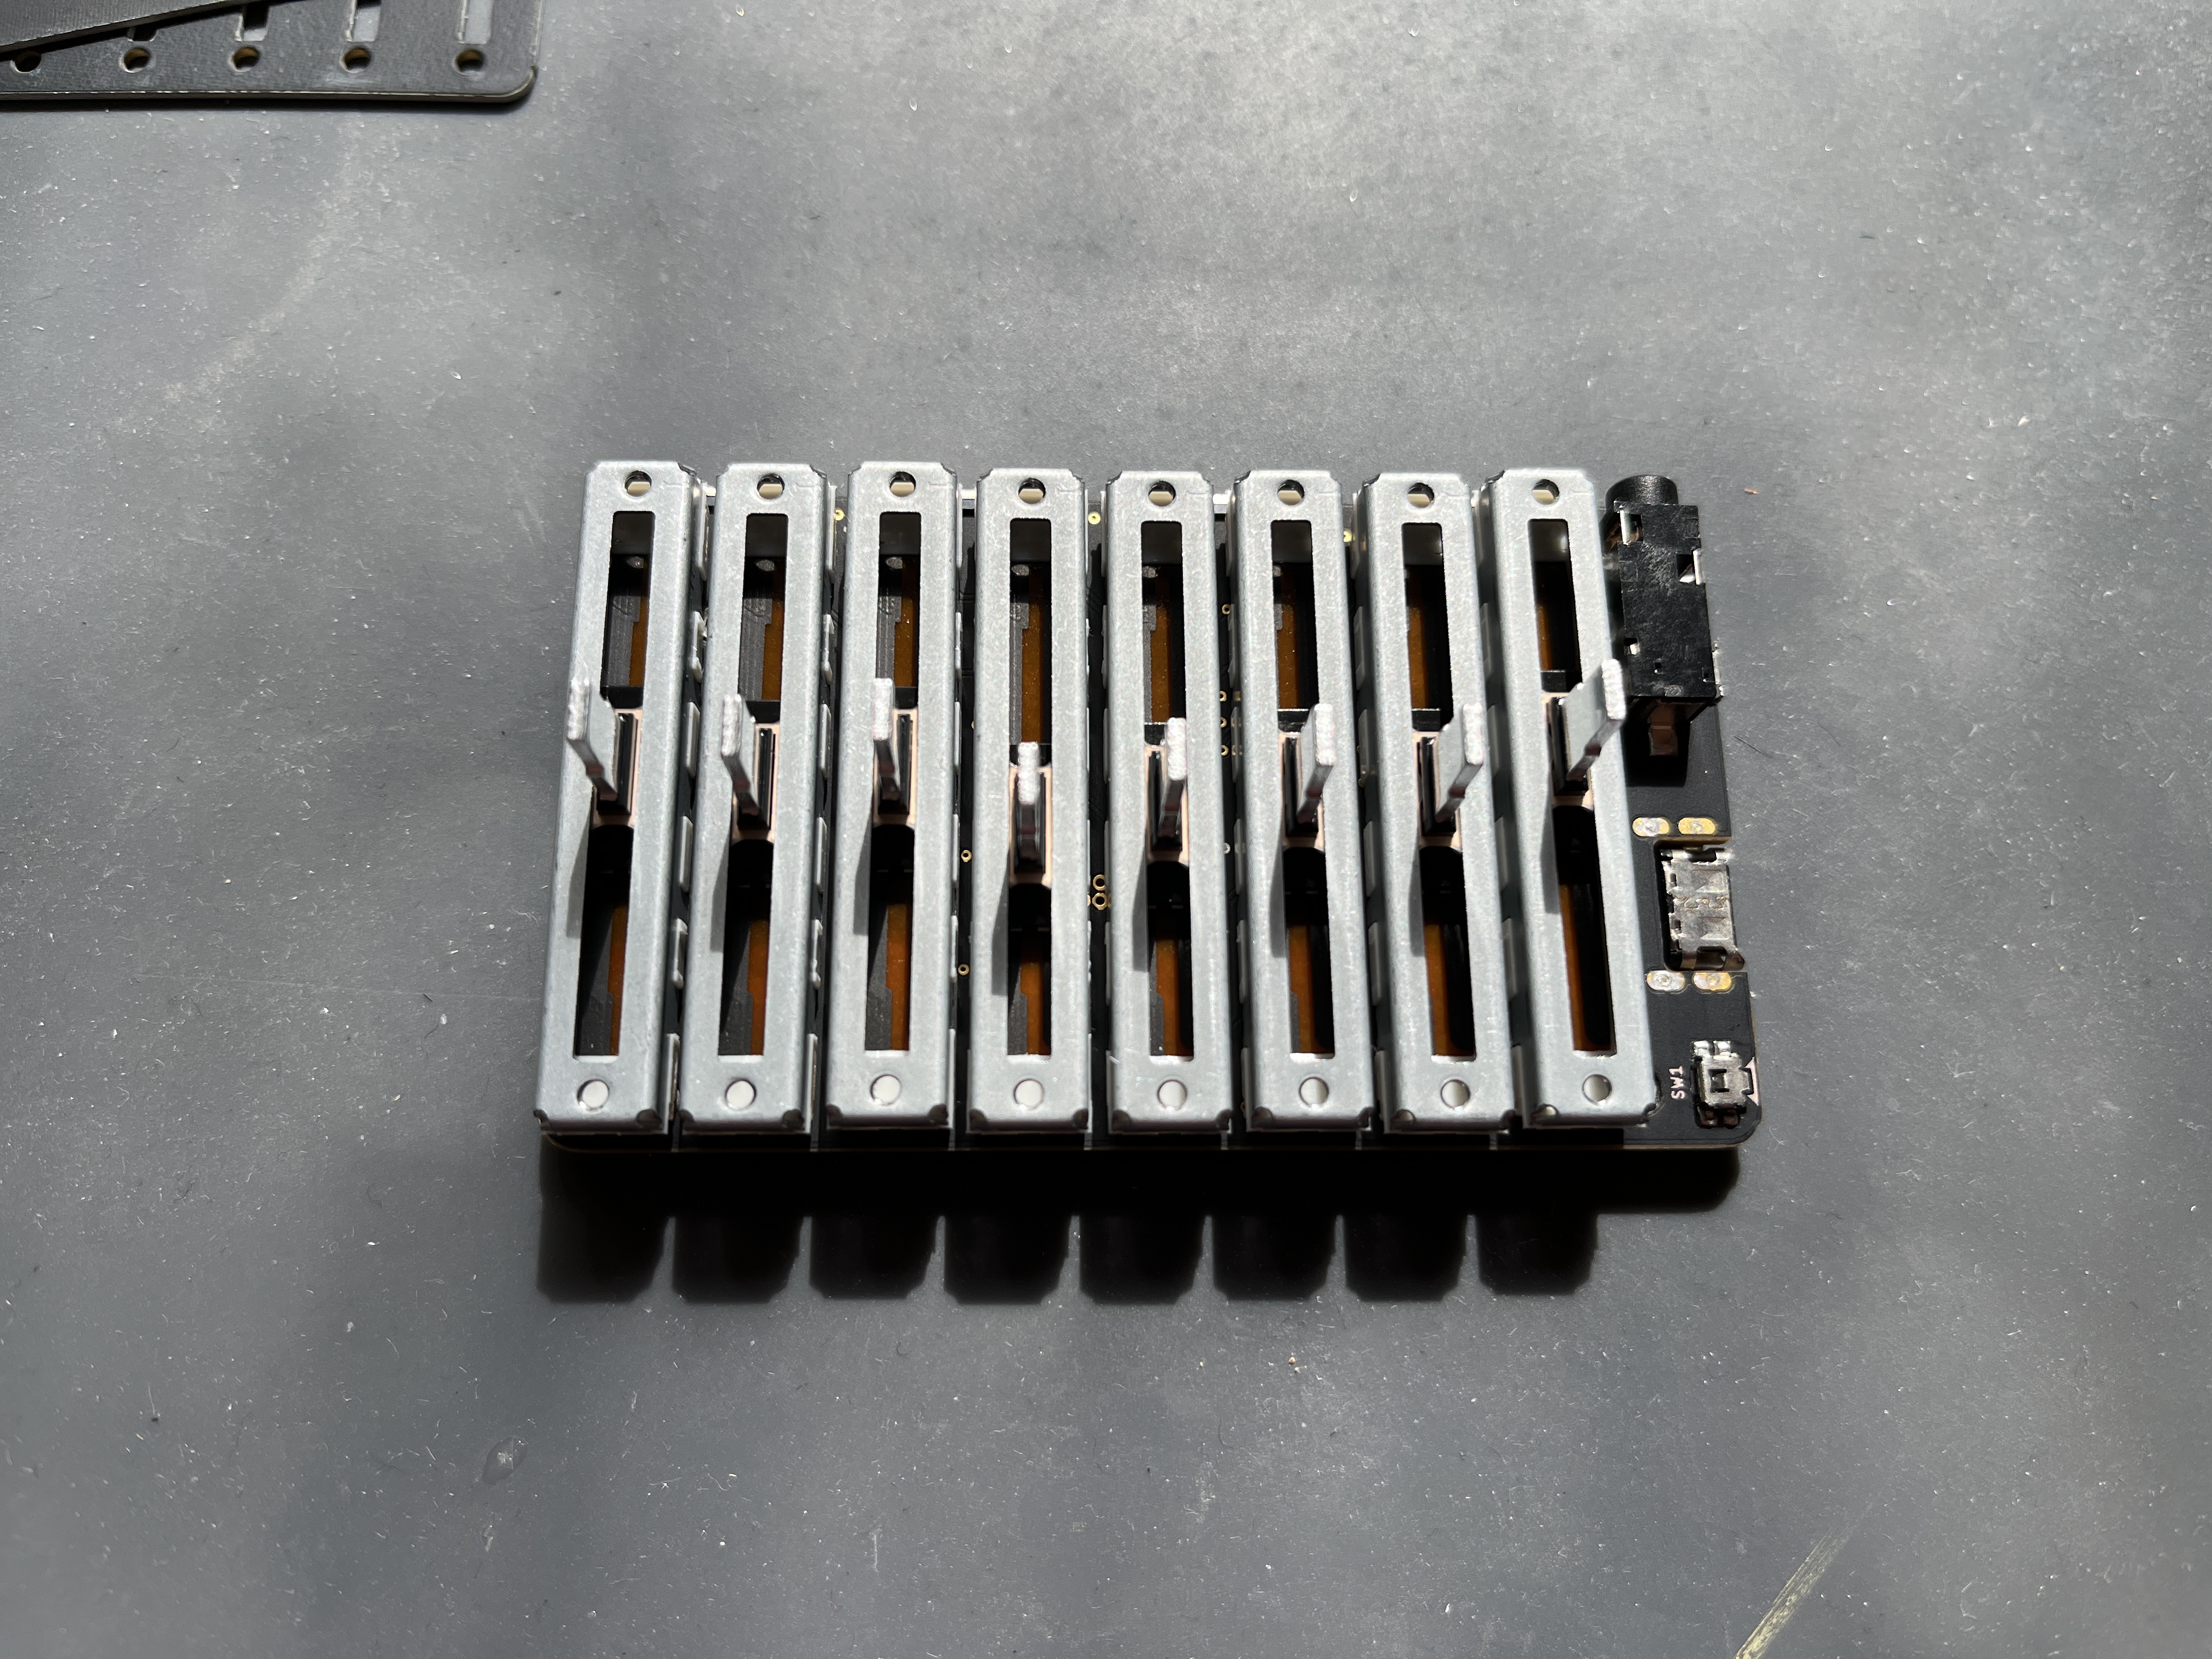
3. Place the faders ←
- Don’t solder anything yet.
- Start by putting all 8 faders in place on the board.
- The faders have 2 pins on one end, 1 pin on the other end
- Ensure all the pins go through the holes - you will probably have to straighten and pins that have got bent in transit.
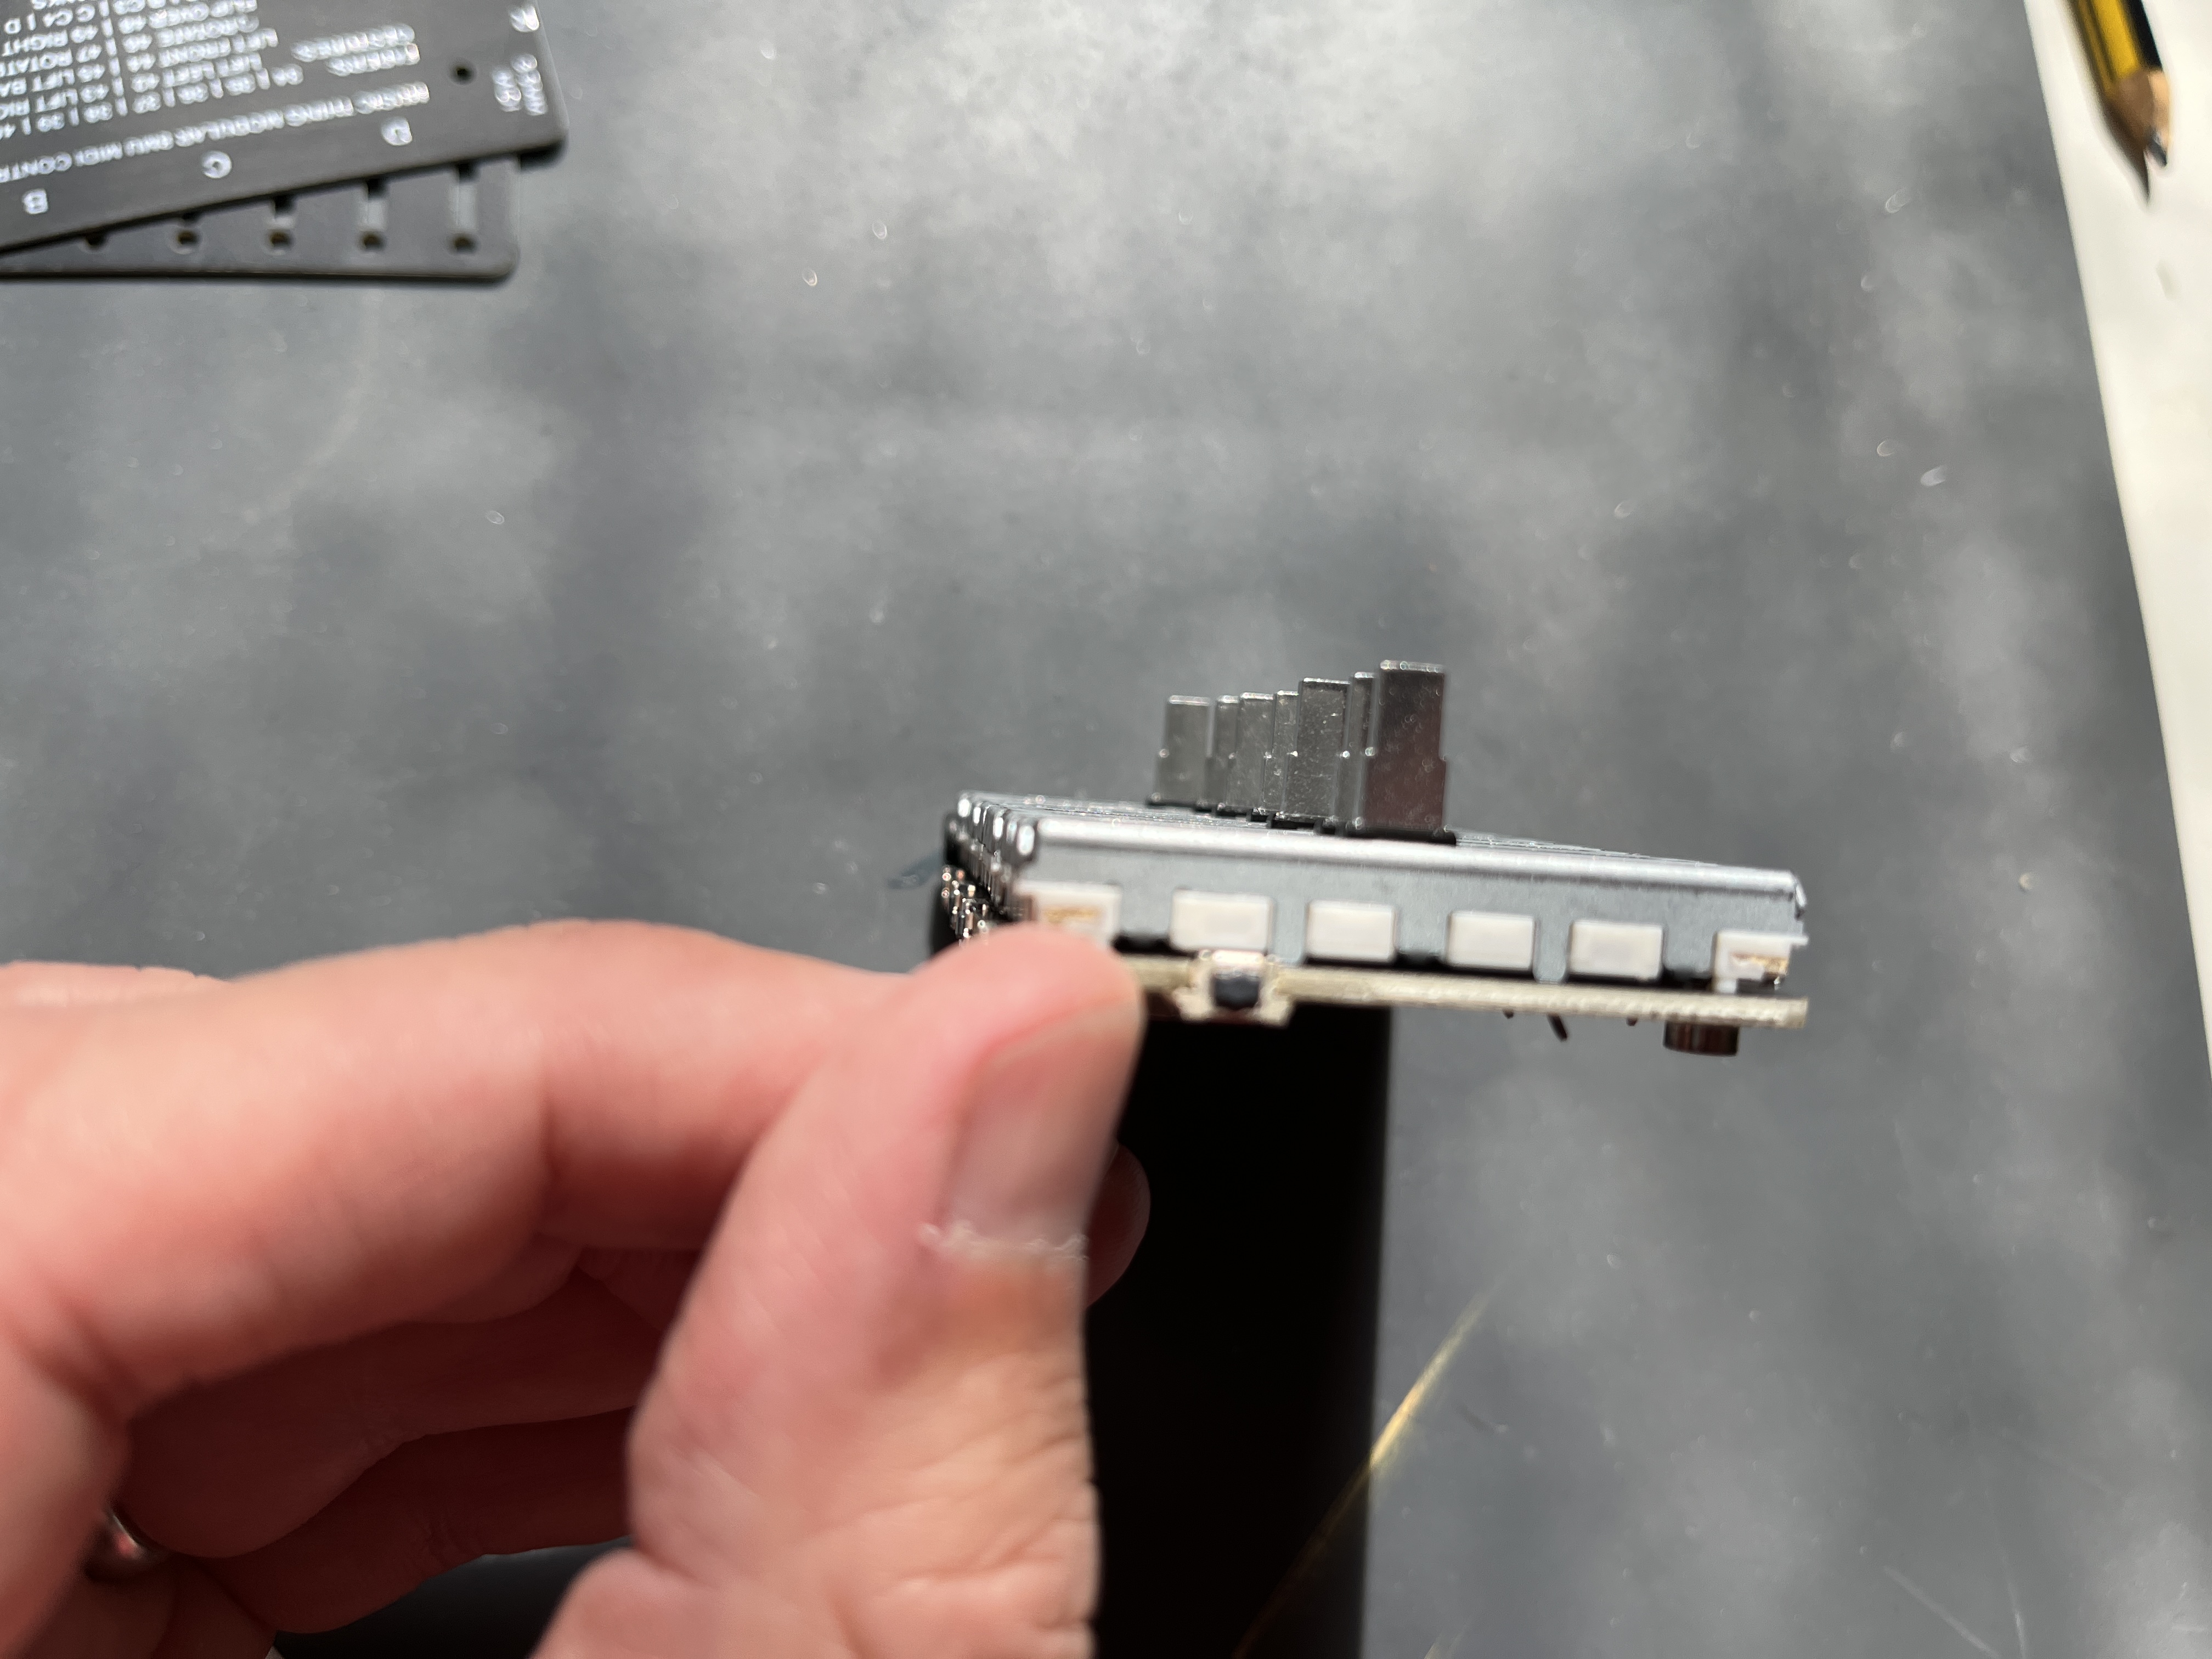
4. Check fader alignment ←
- Before soldering: Ensure the faders are flat and aligned with the board.
- Don’t solder anything yet!
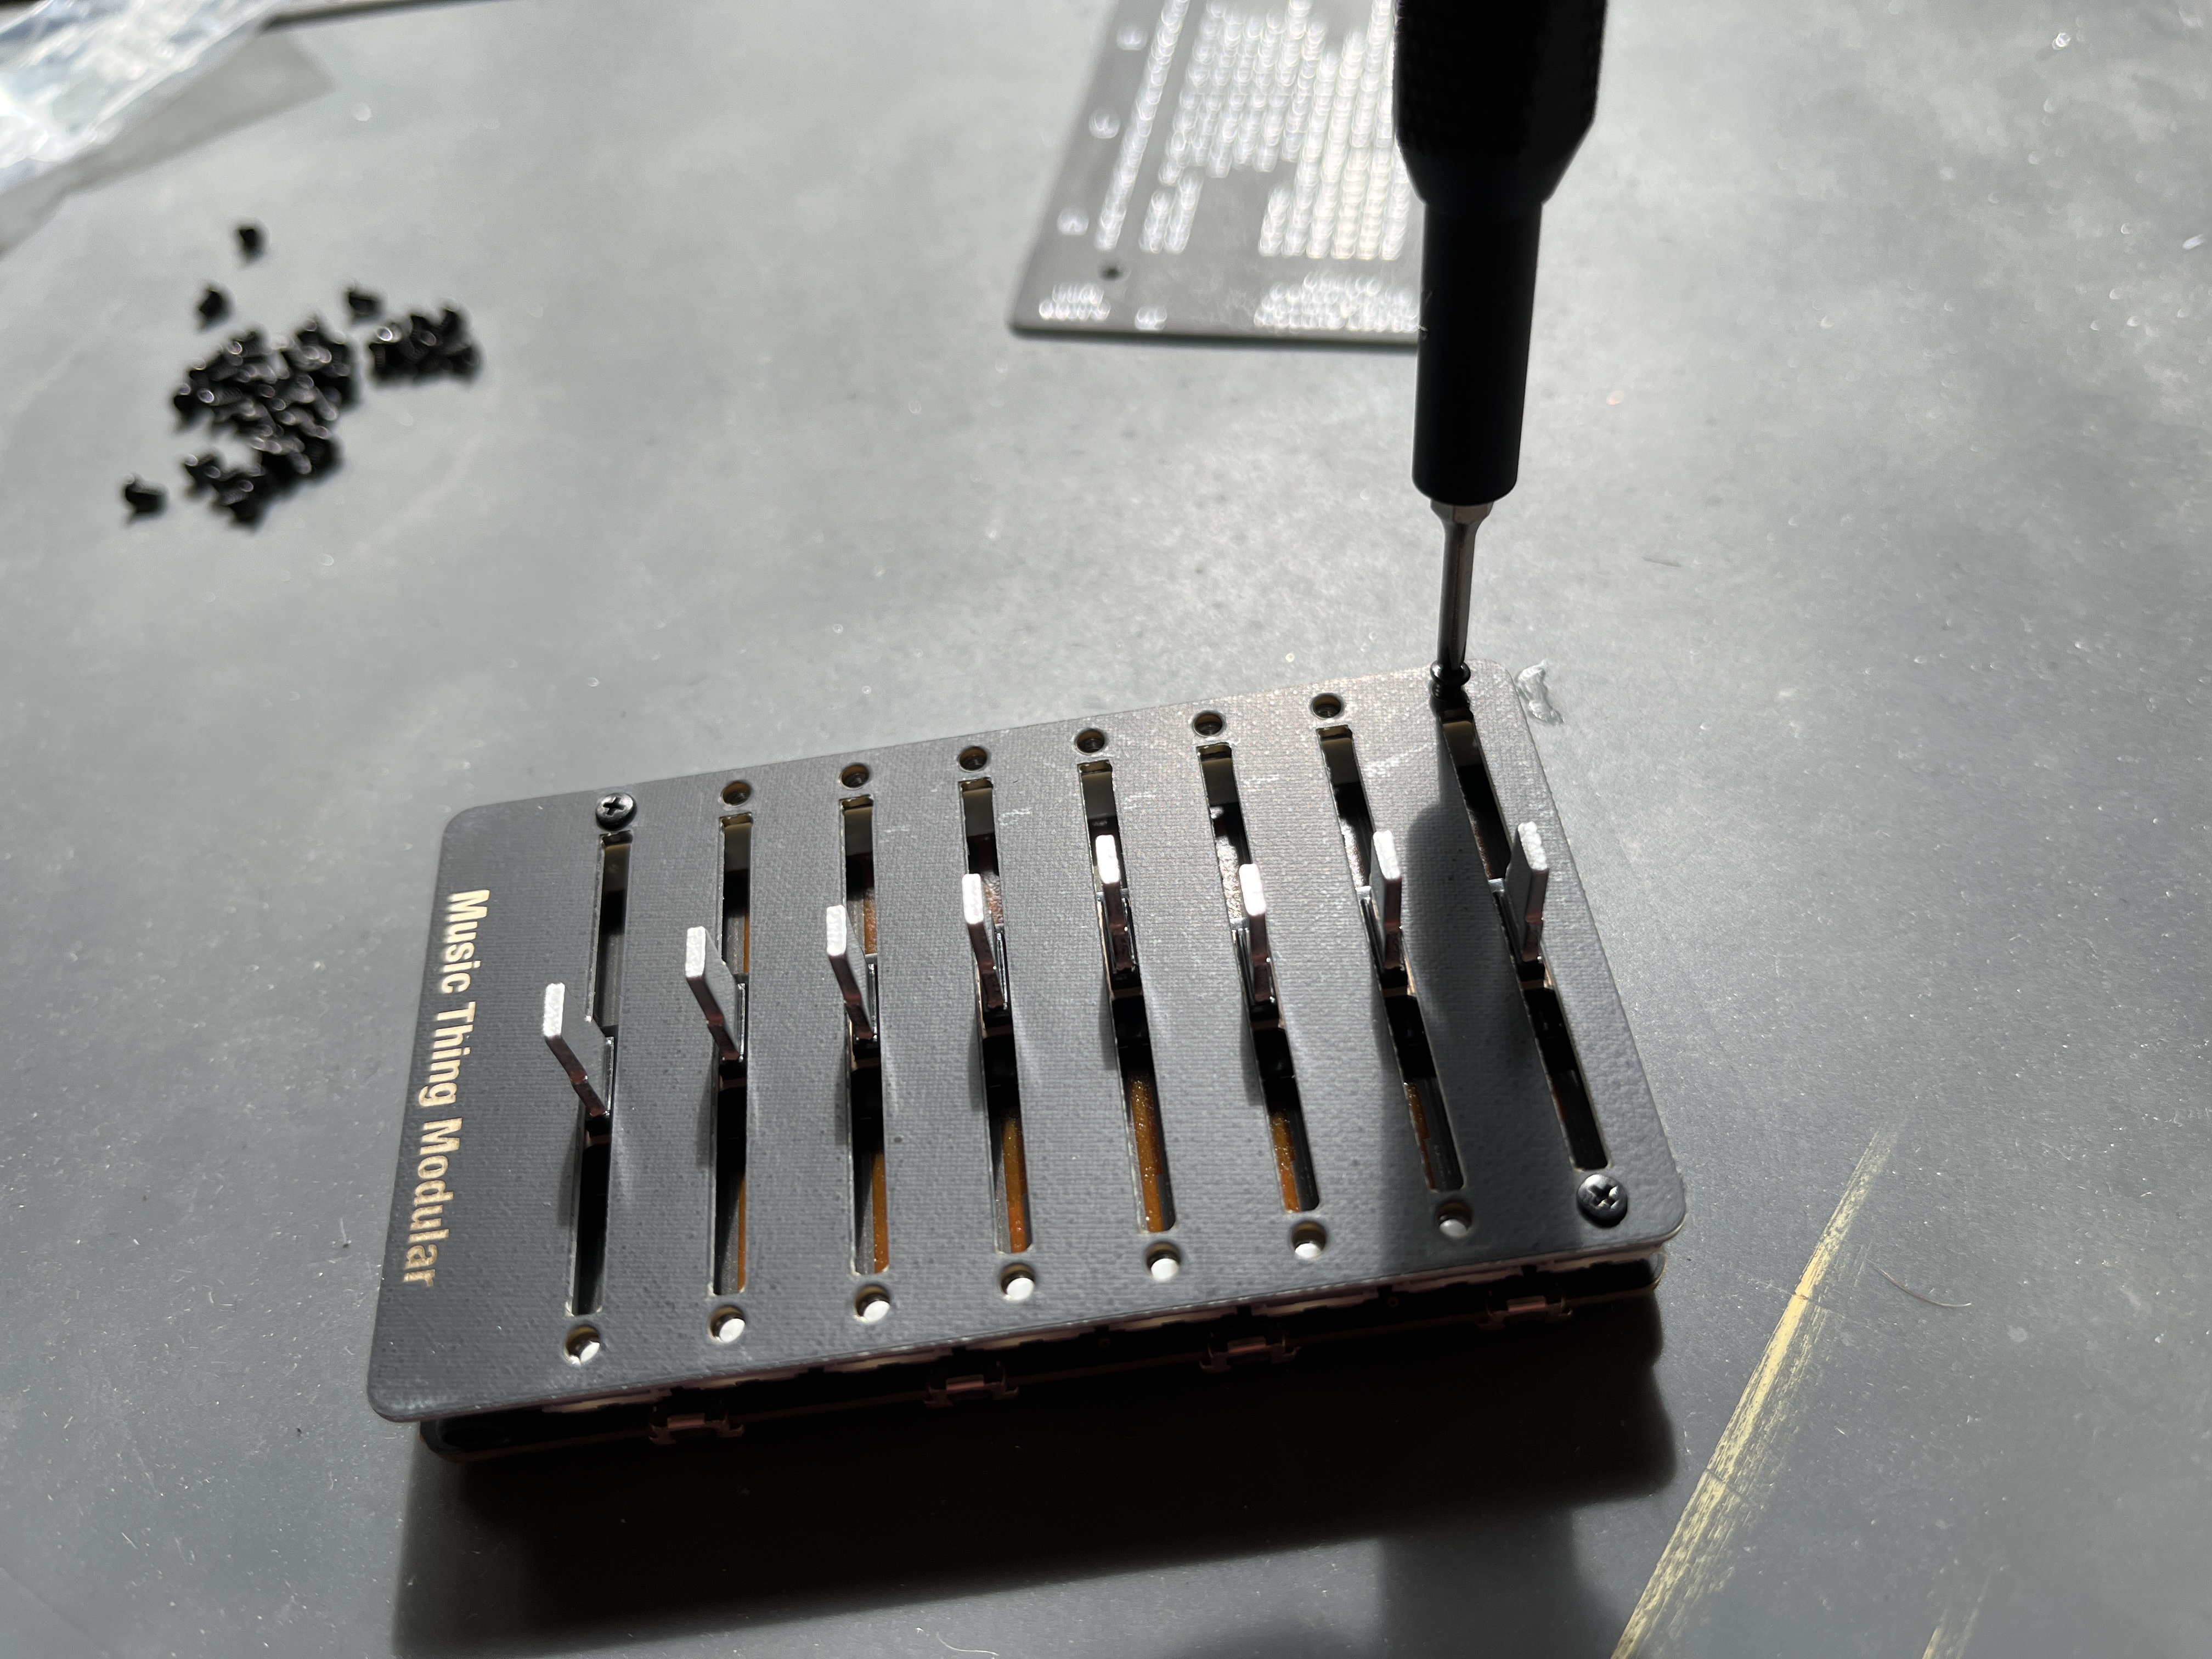
5. Screw on the front panel ←
- Don’t solder anything yet!
- Put the front panel in place, and add the 18 x m2 screws.
- The perfect size is a 2.5mm philips screwdriver but 3.0mm works well. 2.0mm is the standard ‘glasses’ size screwdriver and that works ok, but can damage the screws if you try and go too tight with it.
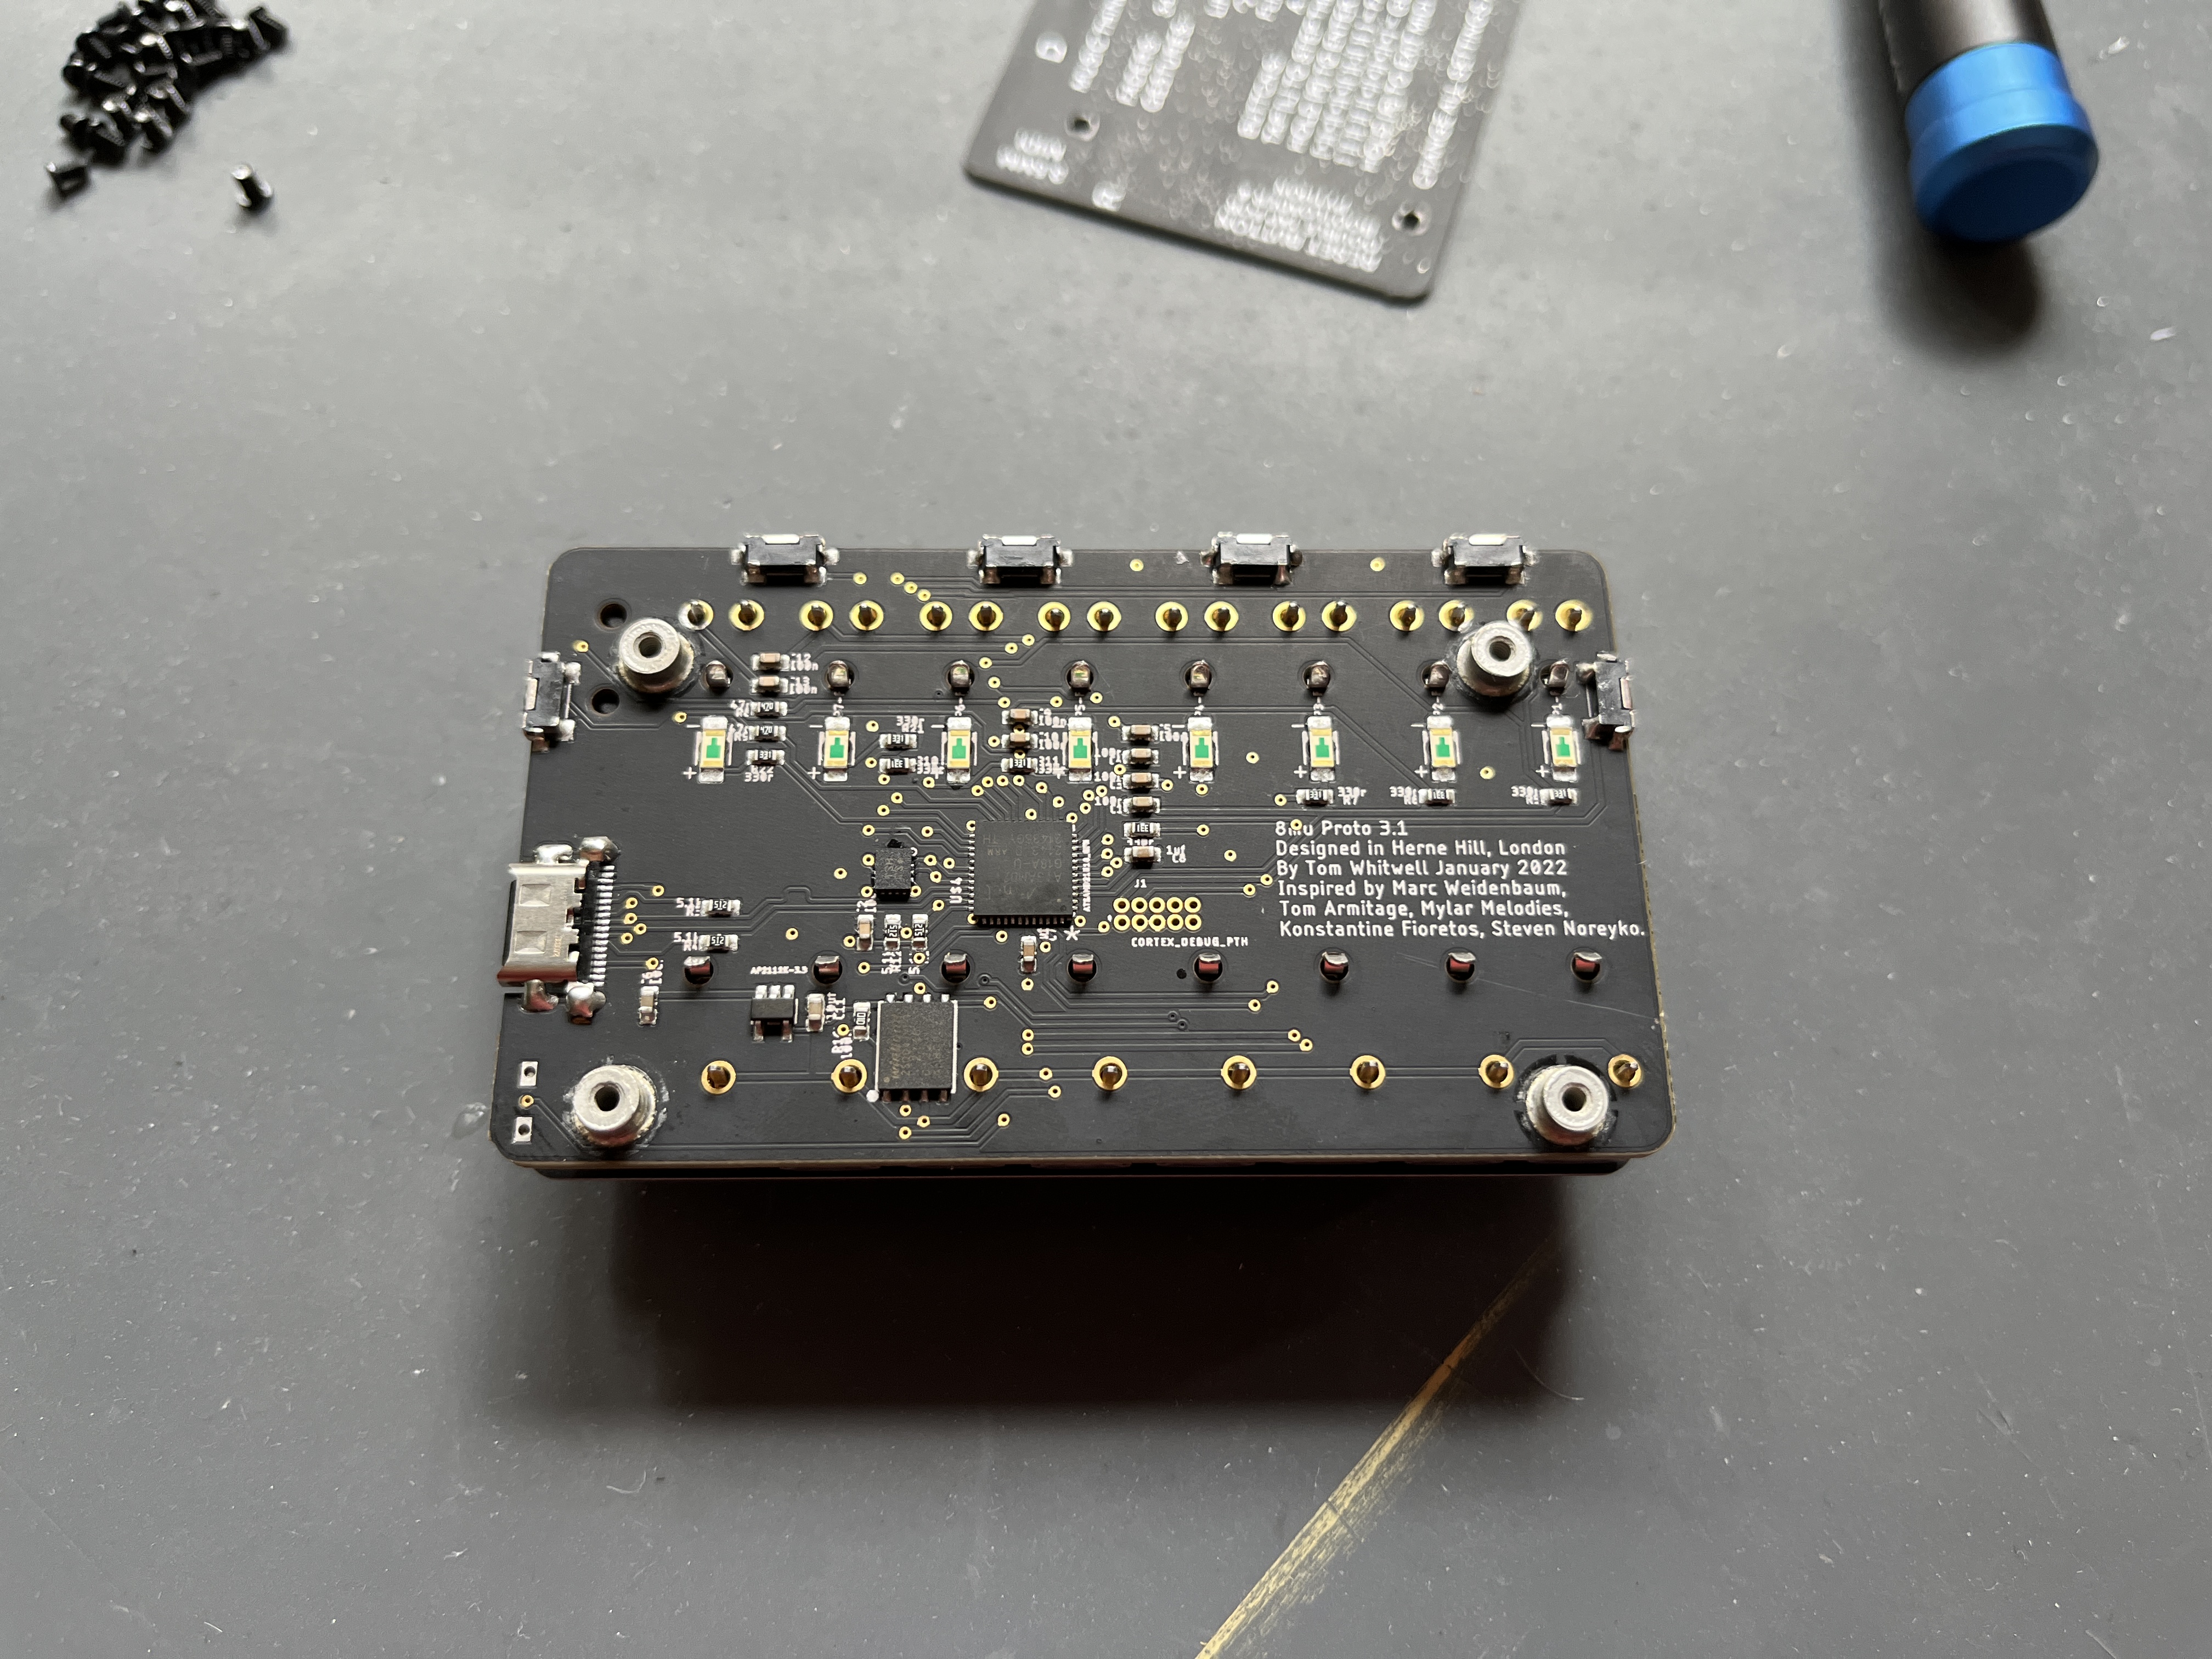
6. Now it's time to solder ←
- Check all the pins are going through the holes, that none are folded underneath.
- Do solder the pins at both the ends of the faders that go through gold holes
- Don’t try to solder the clips on the faders that go through black unplated holes - there’s nothing to solder onto.
- The pins on the faders are quite large, so need some time to absorb the heat - go slowly and ensure the solder is flowing down into the holes
- Be careful not to touch any of the tiny surface mount components with your soldering iron
- Check your work carefully - it’s surprisingly easy to miss a connection, and annoying to debug later - you can get weird random errors
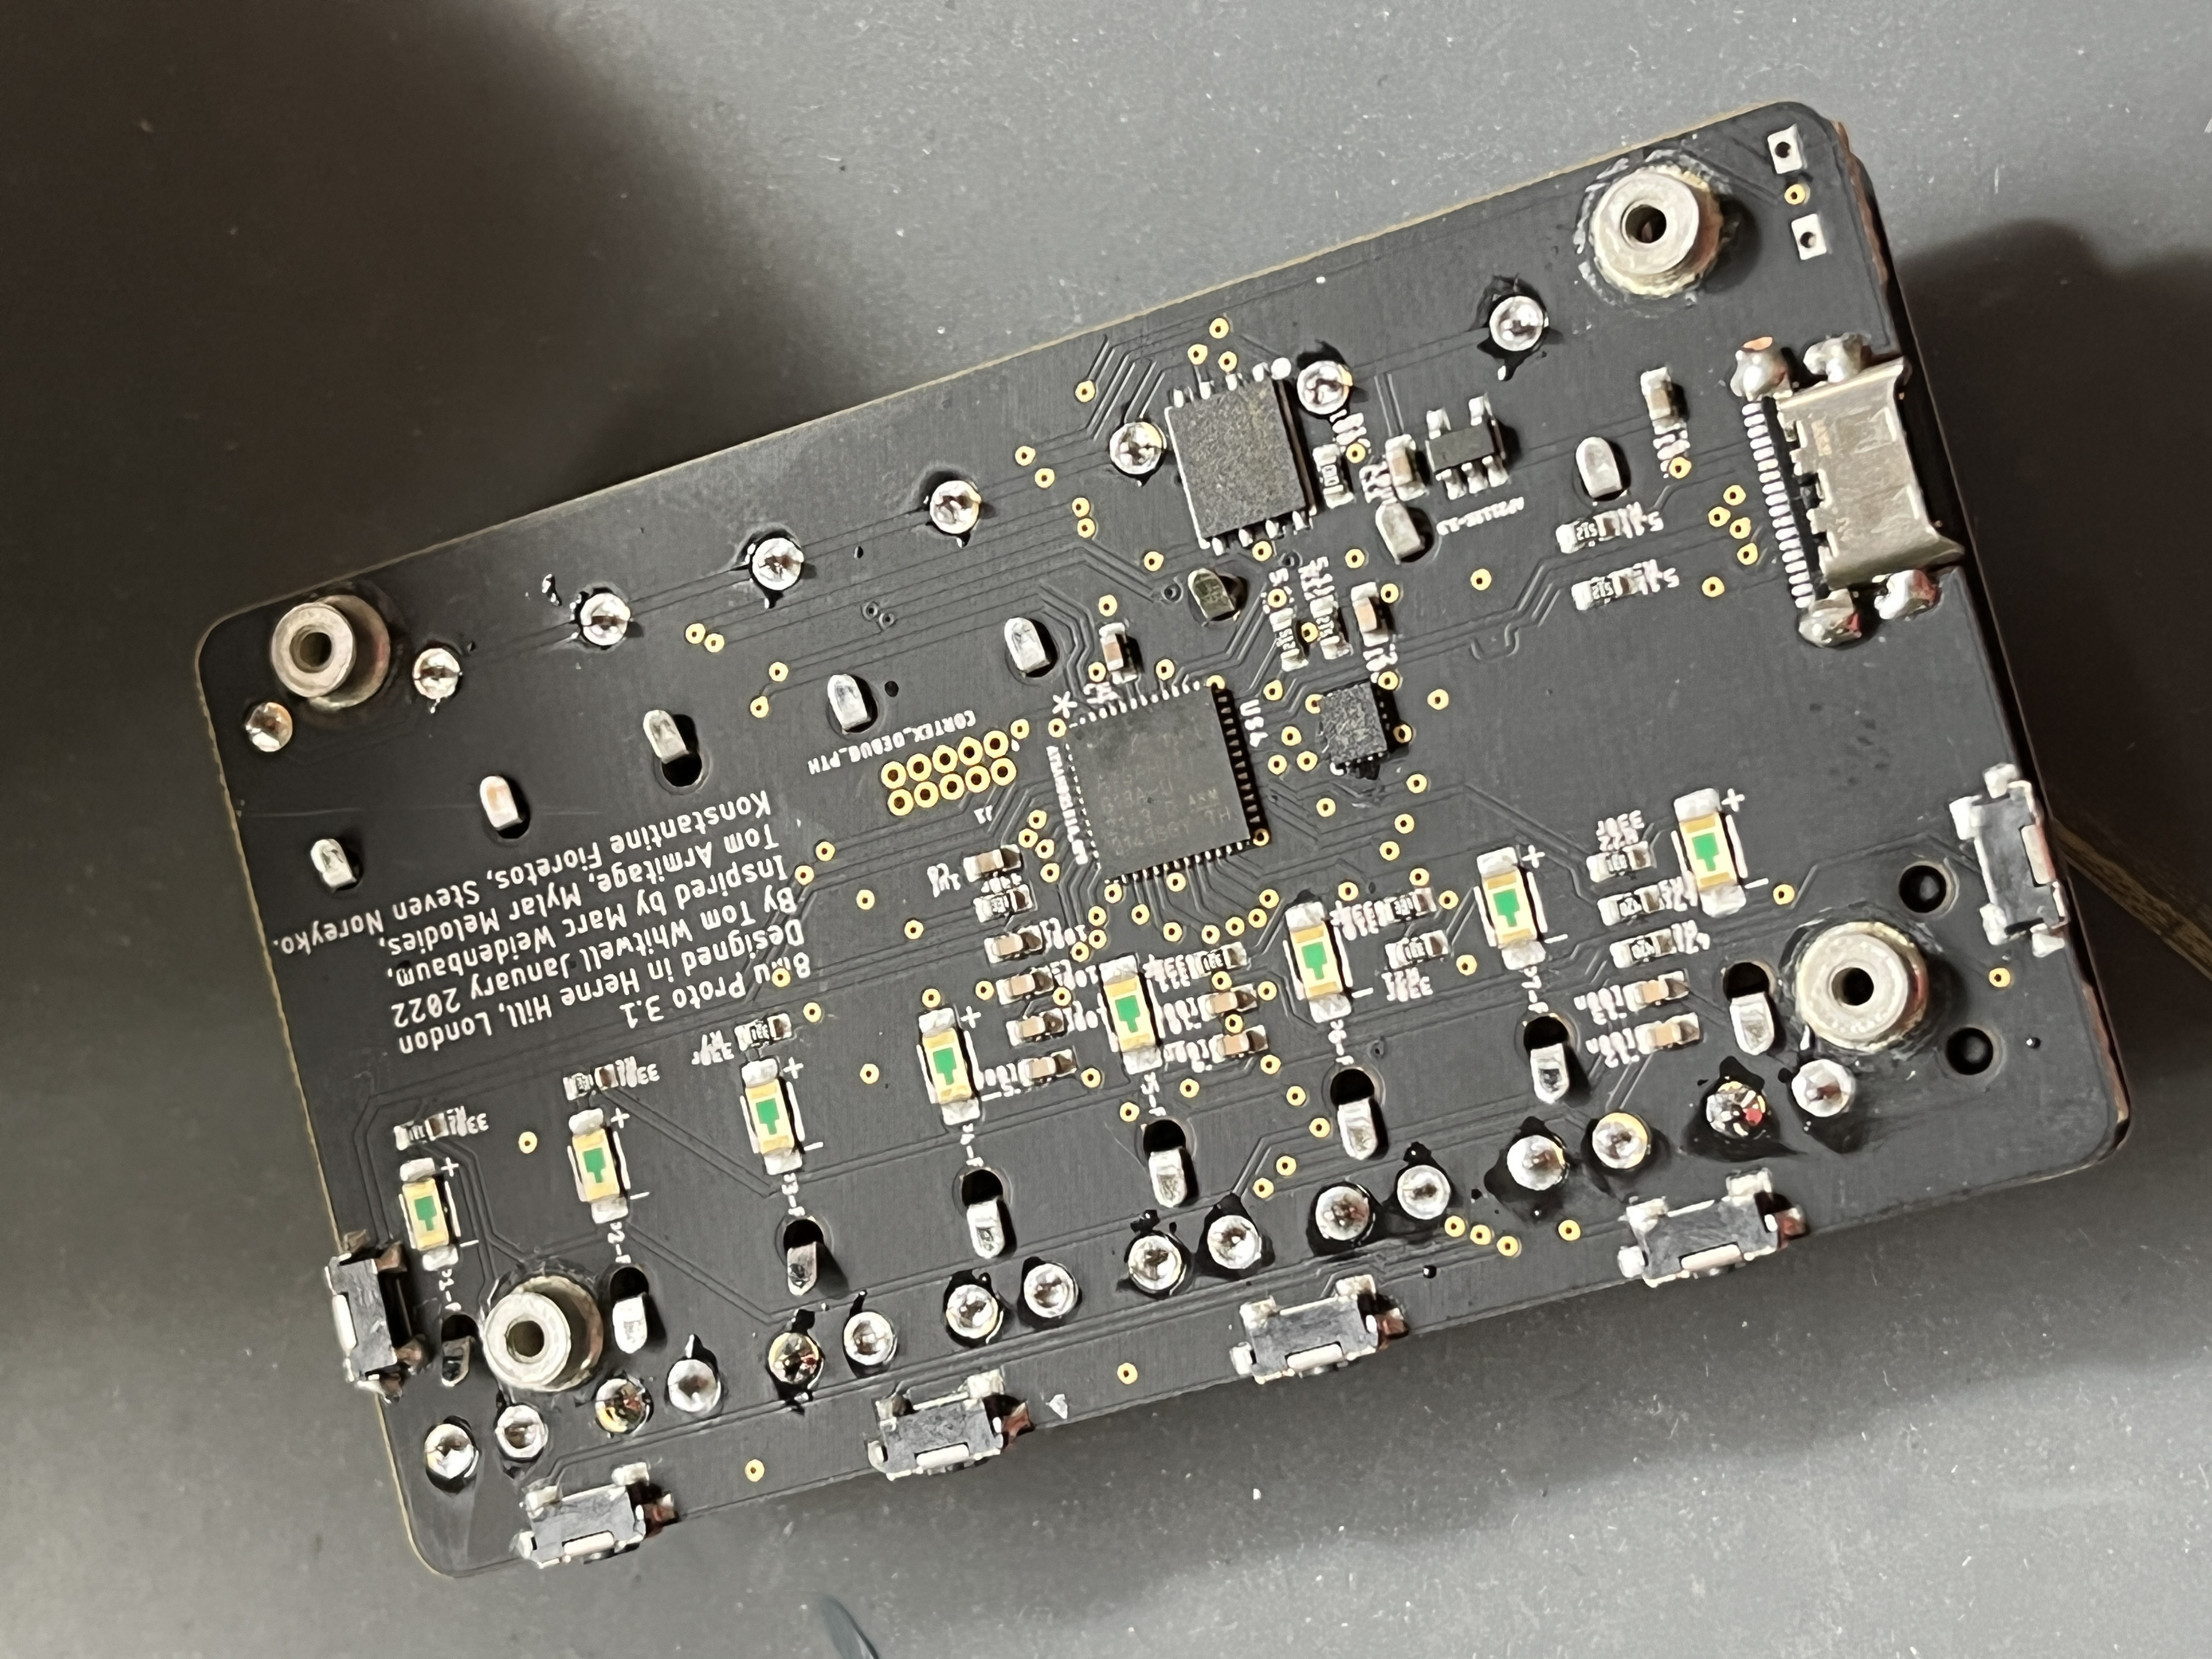
7. Tidy up the back of the board ←
- There is just 3mm clearance between the PCB and the back panel
- But the fader clips and the fader legs may be longer than 3mm
- So, gently fold the ends of the fader clips down onto the board - use a little screwdriver.
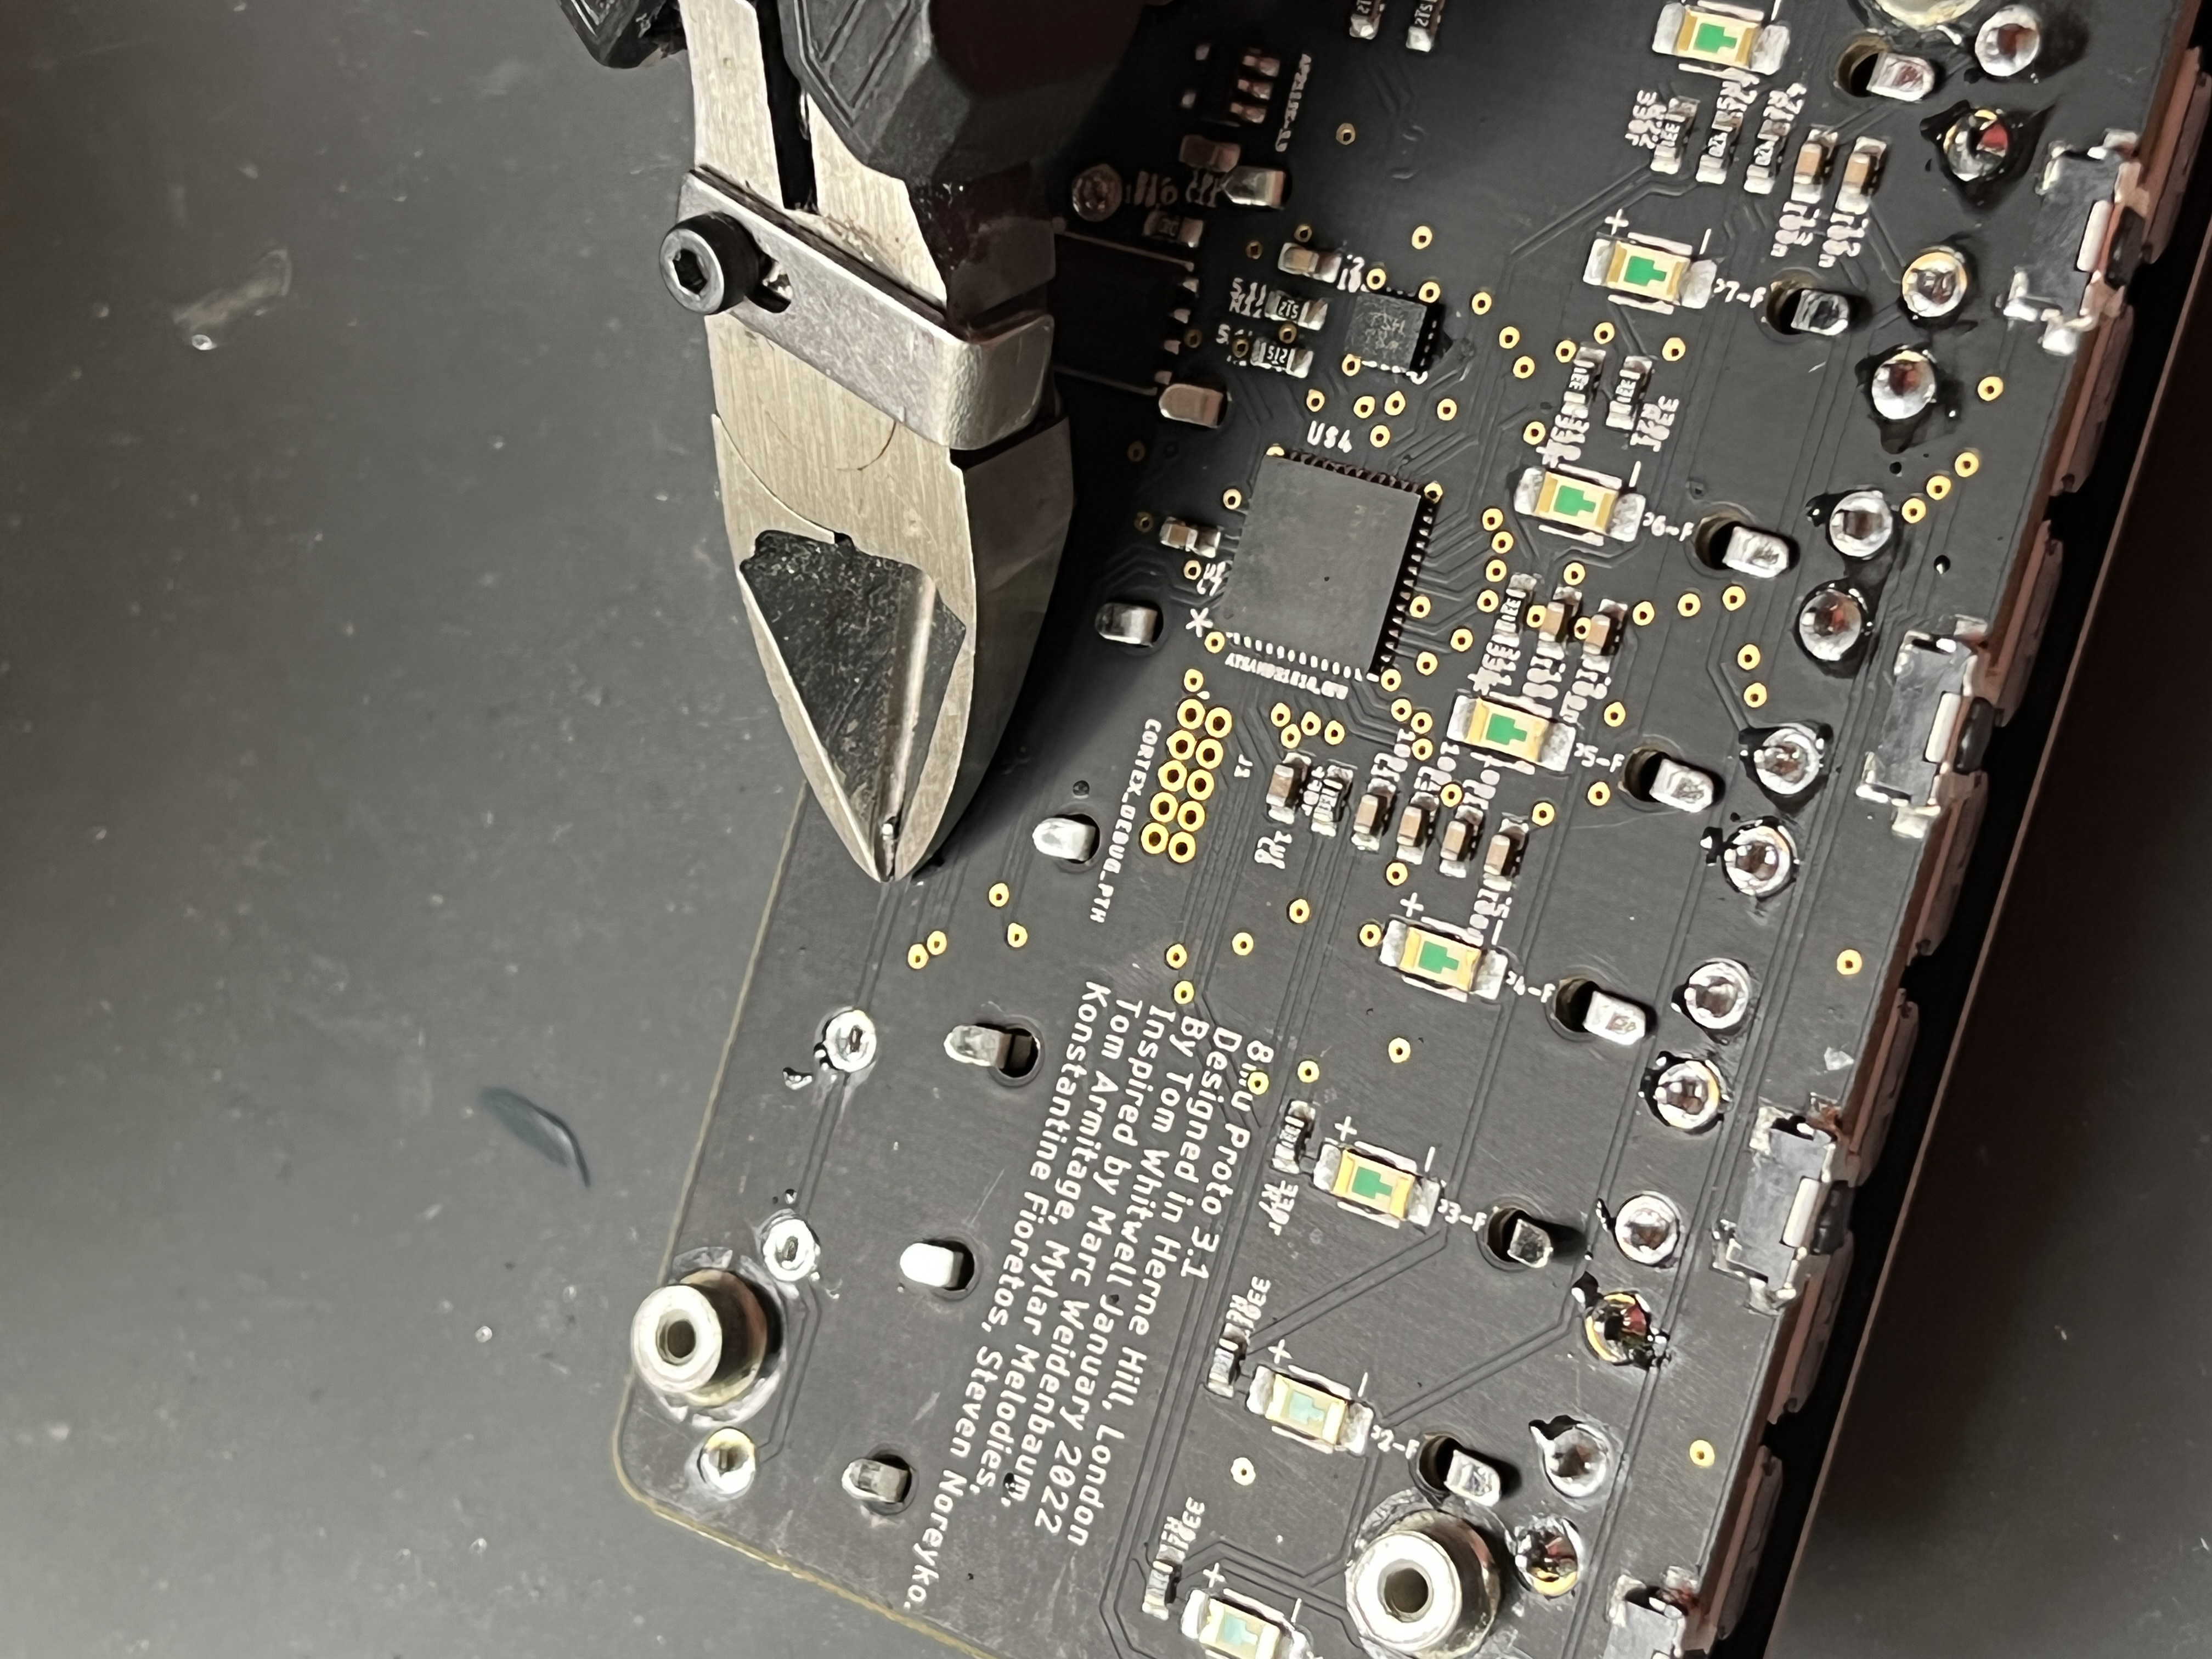
8. Flip the fader legs ←
- Carefully trim the legs of the faders with some diagonal trimmers.
- Be careful not to mash up any of the little SMD components.
9. Finish it off ←
- Screw on the back panel with four m2 screws
- DON’T WORRY if you have a couple of spare screws left - Thonk put in extras in case you drop one.
- Attach the rubber fader caps. Lightly squeeze the rubber caps between your fingers for 20-30 seconds. This warms them up and makes them more malleable to get on the faders.
- The 8mu was designed to be hand-held, but here are a few ideas about mounting your 8mu.
- Use stick-on rubber feet if you’re putting it on something that might scratch
- Non-slip silicone gel pads work well for safe semi permanent mounting on keyboards, desks or walls.
- Velcro tape works for stompbox-style mounting
- That’s it, make yourself a cup of tea to celebrate.
User Manual ←
In Use ←
- It’s pretty simple.
- You plug the 8mu into your computer.
- 8mu will show up on your computer as “Music Thing M0 Plus”.
- 8mu sends out MIDI data over USB. Your DAW (or a browser, or pD or whatever) can pick up that MIDI data.
- If you want to change how the data is used, you make changes in your DAW - you’ll have to read the manual for that. For example, in Ableton Live, you need to go to Settings / MIDI / MIDI Ports and check ‘Remote’ next to Music Thing M0 Plus.
- If you want to change how the data is sent, you make changes in the 8mu editor where you can configure which controls are sent on which CC and channel.
- By default, the 8mu sends a lot of data from faders and the accelerometer. You might want to go to the editor now and turn off a few channels (set them to Channel Zero).
The Editor ←
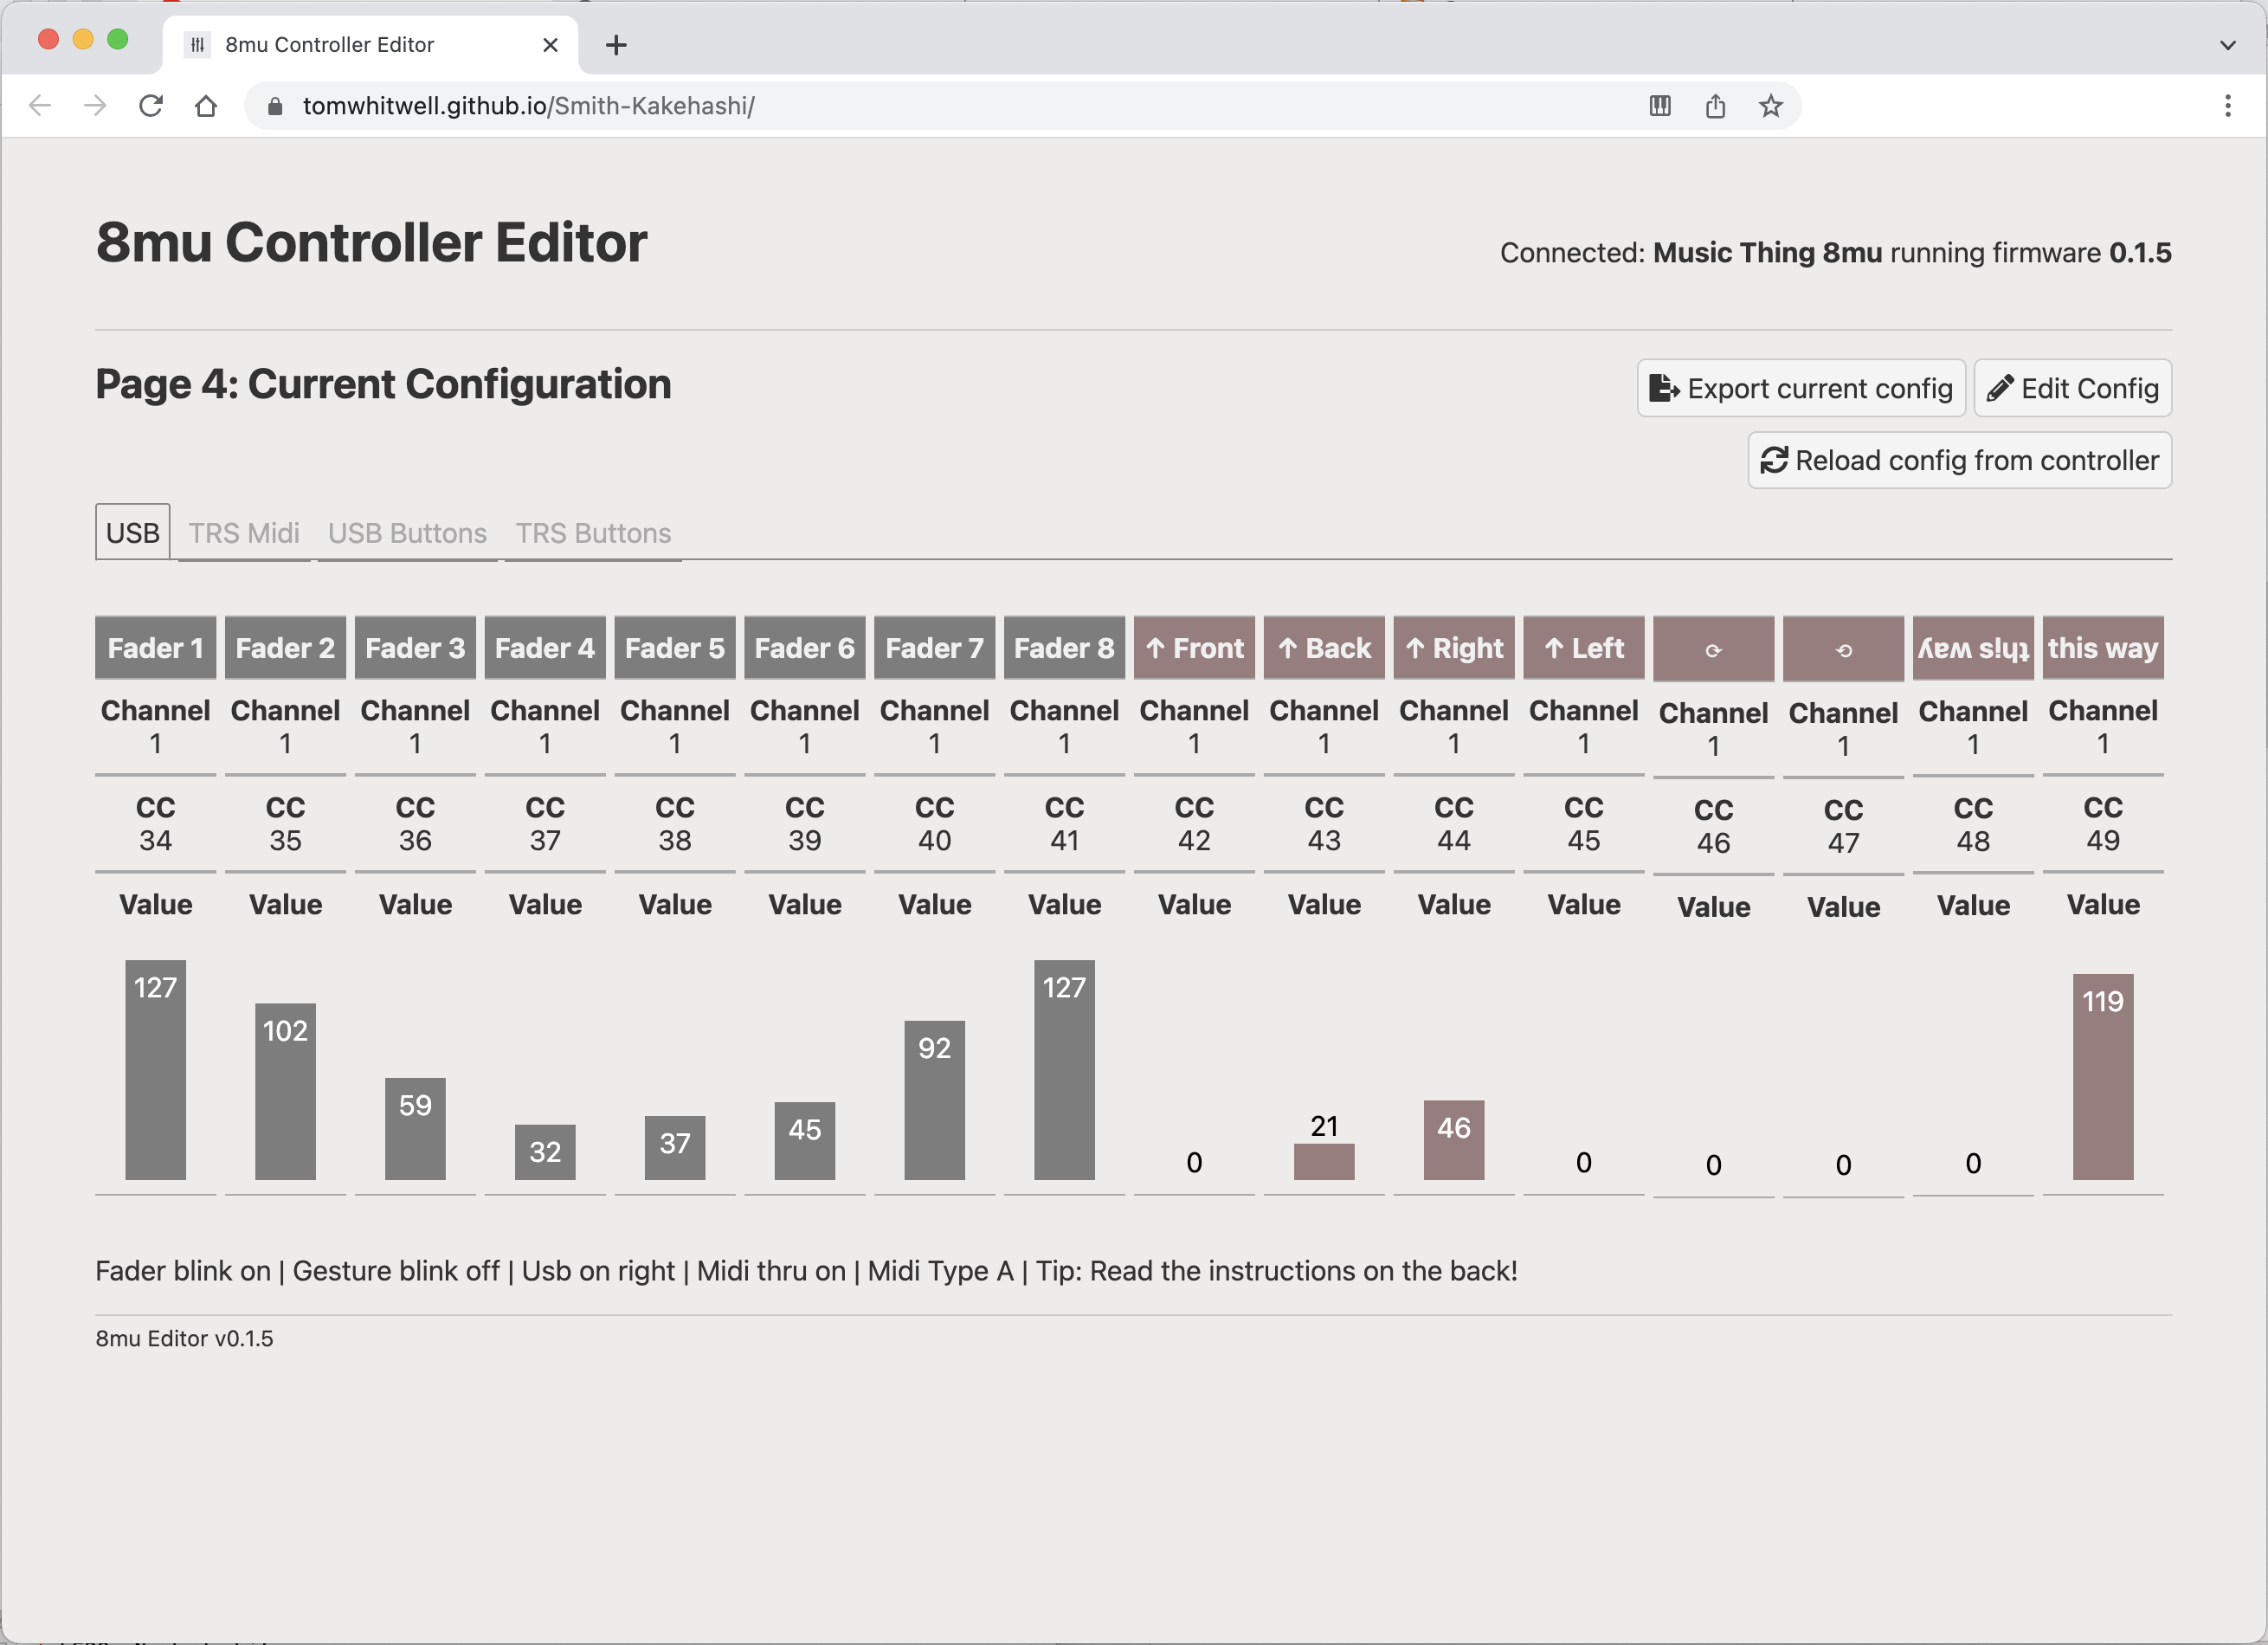
- Launch the 8mu Editor
- The Editor lets you configure your 8mu in a browser, and monitor the outputs from faders and accelerometer channels in real time.
- The browser (Chrome) talks to the 8mu via old-fashioned sysex messages, so it takes a second or two to connect, and to update when you change banks.
- The editor is a port / hack / Bowlderisation of Tom Armitage’s 16n Editor.
- The editor lives in my Smith-Kakehashi repo, obviously.
- Important: You can turn off channels by changing the channel number to Zero.
Banks ←
- The device stores 8 independent banks of settings
- By default, all banks are identical
- Tap the left or right buttons to move up and down through the banks
- You’ll see the bank LED move
- After a second, that bank will be selected and you’ll see an LED confirmation animation
- The editor configures the current bank - it has no visibility of the other banks.
- The current bank remains between power cycles. If you move to bank 4, then never change bank, the device will always be in bank 4.
- To move or copy a bank, use the editor to “Export current config” of that bank. This downloads a little local file. Then switch banks, and import that configuration.
TIP: You might want to go to the 8mu Editor and set up some banks with different settings - for example, turn off some of the gesture channels by setting the channel to zero. this makes the 8mu a bit more manageable in use.
MIDI Learn mode ←
- The accelerometer channels send a lot of data as the device moves. This makes it really annoying to use MIDI learn, for example creating custom MIDI mappings on Ableton.
- It’s hard to map a control to Fader 1 when the accelerometer is spitting out lots of movement data.
- So, 8mu has two MIDI Learn modes which temporarily turn off accelerometer outputs.
- In the first, the accelerometer channels are simply turned off, so data from the faders is clean.
- In the second, the faders are mapped to accelerometer channels, so they can be predictably controlled. So, to map filter cutoff to ‘Lift Front’, enter MIDI Learn Mode 2, and move the first fader. Exit MIDI Learn mode filter cutoff will be correctly mapped.
- Getting in and out of MIDI Learn mode:
- Hold the RIGHT button.
- LEDS will flash 🟡🟡🟡🟡⚫⚫⚫⚫
- You are in Fader mode, accelerometer gestures are disabled
- Hold the RIGHT button again:
- LEDS will flash ⚫⚫⚫⚫🟡🟡🟡🟡
- You are in Gesture mode, the accelerometer gestures are mapped to the 8 faders
- Hold the RIGHT button a third to EXIT MIDI learn mode.
Updating the firmware ←
- When new firmware is available, you’ll get a notification in the top right hand corner of the Editor.
- Firmware updates are supplied as .uf2 files.
- To install a firmware upgrade
- Double click the TINY button next to the USB cable until a folder called MTM_BOOT appears on your desktop.
- NB: The double clicking is tricky! Try a bit faster or a bit slower.
- Drop the UF2 file onto that folder, the device will reboot and MTM_BOOT will disappear.
- Once the led is smoothly fading, the MTM_BOOT folder should appear.
- This will probably cause an ‘Disk Not Ejected Properly’ error, don’t worry about it.
- NB: In early versions of MacOS Ventura, this dragging method produces an error. You may have to copy the .uf2 files on the bootloader using terminal:
cp -X [source].uf2 [destination]
Calibrate the faders ←
- Most people never need to calibrate their 8mu. Only read this section if your faders don’t go to 0 or can’t reach 127.
- When they’re manufactured, every batch of faders comes out slightly different. To compensate for this, you can adjust start and end points for your faders in the editor, under ‘Device Options’
- These fader settings are global: You can only change them while in Bank 1.
- NB: these instructions are quite counter-intuitive, so read this carefully!
- For Reasons, the Fader Maximum value relates to the BOTTOM of the fader range (assuming the USB cable is on the right so the controller is not in ‘flipped’ mode). The Fader Minimum relates to the TOP of the range.
- If when you pull the fader down, it sticks at 1 or 2 or more, so doesn’t get all the way to 0, you should reduce the Fader Maximum value, maybe to 4080.
- If when you push the fader up, it stick at 126, 125 or less, so doesn’t get all the way to 127, you should increase the Fader Minimum value, maybe to 100.
Calibrate accelerometer ←
- You can also calibrate the accelerometer, if you get strangeness there:
- Place the 8mu on a firm horizontal surface before you start.
- Remove the power cable
- Hold down the A button
- Connect the power cable
- It just takes a second to calibrate, there is a LED animation on completion
A note on battery power ←
- 8mu draws a maximum of about ~30mA of power
- This isn’t enough to keep many USB Battery Packs active - they shut off after a few minutes, sometimes in weird ways (one of mine put the 8mu into a zombie mode with flickering lights)
- So, you need a battery pack with an ‘Always on’ or ‘Trickle Charging’ mode: Voltaic Systems are slightly expensive ‘pro’ batteries designed for timelapse photography, but Anker batteries are normal priced and have a trickle mode that lasts 2hrs before needing to be restarted.
Backing up 8mu settings ←
- Use the ‘Export current config’ button in the editor to download the current bank as a json file.
- Then, click ‘Edit config’ to import a local json file.
- Unfortunately you have to do this for each bank separately.
Resetting 8mu ←
- Soft reset: this returns all the settings and banks to their original settins.
- Remove the power cable
- Hold down the the A,B,C and D buttons
- Connect the power cable
- You’ll see a quick LED animations as settings are written
Initial Settings ←
- 8 Faders, left to right (with USB cable on the right)
- CC 34, 35, 36, 37, 38, 39, 40, 41
- 8 Acellerometer gestures:
- Lift Front: CC 42
- Lift Back: CC 43
- Lift Left: CC 44
- Lift Right: CC 45
- Rotate CW: CC 46
- Rotate ACW: CC 47
- Not inverted: CC 48
- Inverted: CC 49
- Leds blink on fader movements, not on Accelerometer movements
- MIDI Thru is on
- The device is NOT flipped - so the USB cable is on the RIGHT
- TRS MIDI sends Mode A (Makenoise, Korg), not Mode B (Polyend, Arturia)
Troubleshooting ←
- Many people have built and used 8mu successfully, but here are a few things to try if you’re having problems
- No MIDI in my DAW: If the 8mu faders move in The Editor, that shows that MIDI signals are being generated by the 8mu, and received by your computer. If they’re not appearing in your DAW or other software, it’s probably a config issue in that software, rather than 8mu.
- MIDI Learn is confused by random midi signals: If you’re using Midi Learn to pair your DAW or synth with 8mu, there are two possible sources of random MIDI.
- The accelerometer channels will send midi whenever you move the device. If you’re not using them, you can turn them off (turn the channels to 0) in the editor. Or you can use MIDI Learn Mode to temporarily turn off the accelerometer channels.
- When using the editor, the board may send midi ‘refresh’ signals and lots of Sysex every so often, so don’t use the editor while setting up MIDI learn.
- Dead faders: Dead faders - where a fader output is stuck on high, or low, or in the middle - can caused by soldering problems. To troubleshoot a dead channel…
- First ensure you’ve installed the latest firmware as before 1.0.2 dead channels could be caused by firmware bug.
- Then reset the 8mu settings by holding down ABCD at startup
- Then check the 8mu isn’t in MIDI learn mode - with 4 of the LEDs flashing.
- Then you can be confident it might be hardware, so remove the USB cable, take off the back panel and carefully check your soldering
- Re-read the instructions and ensure the pins on the ends of each fader are properly soldered. The pins are quite large, so you might need to hold your soldering iron to them for 5 seconds to properly melt the solder and have it flow into the hole.
- NB: You don’t need to solder the clips in the middle of the fader - you need to fold them down
- Ensure you’ve trimmed the board and folded down the clips.
- Test the board again with the editor. If you still have problems and you’re a Thonk Customer, contact Thonk support to ask for help.
- Dead buttons If you have a dead button, it’s likely to be a hardware issue, so contact Thonk support to ask for help.
- Scratchy faders In a very few early units, the slots for the faders were too narrow. If your faders feel stiff or scratchy, contact Thonk support to ask for help.
- 8mu seems dead with strange LEDs or no LEDs. If you’ve been experimenting or are checking a board for someone else, it could be the firmware isn’t properly installed. Here’s how to troubleshoot an 8mu board.
Hacker's Guide ←
8mu is also designed to be open and hackable. It can be re-programmed in Arduino or Circuit Python code, and makes a good platform for experimenting with algorithmic music generation. You could probably add OSC control, and can even output (loud and gnarly) audio from the 3.5mm MIDI port.
- How 8mu Works
- Arduino with 8mu
- Circuit Python with 8mu
- Hello World for Arduino & Circuit Python
- 8mu pinout
- Reinstall stock firmware
- Ideas and examples
- Getting involved and contributing to 8mu
How 8mu works ←
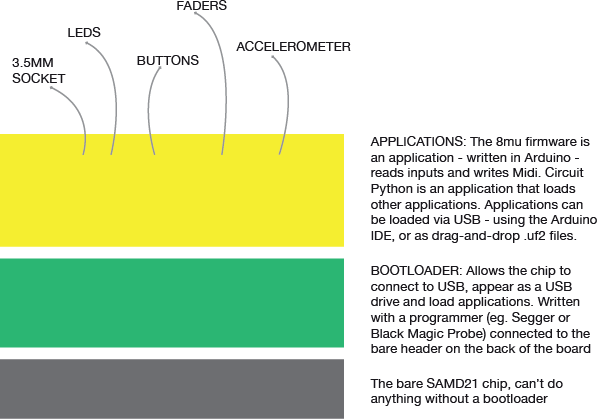
- 8mu hardware consists of a SAMD21 microcontroller, a BMI160 accelerometer connected with I2C, an 8mb flash memory chip connected by SPI, and the faders, LEDs and buttons you can see.
- This is the 8mu Schematic and the design files are in the 8mu_Public repo on Github
- The main 8mu firmware is written in basic Arduino code. You can edit 8mu.ino in the Arduino IDE, once you install the board definitions and include the libraries specified in the comments at the top, including this BMI160 driver from github.
- Confusingly, the 8mu firmware uses the external Flash file system installed by Circuit Python. I’m sure there is a better way to do this, but at the moment, every 8mu has Circuit Python installed, then the 8mu firmware installed on top. CP only needs to be installed once.
Use the Arduino IDE with 8mu ←
- In the Arduino IDE: Add
https://raw.githubusercontent.com/TomWhitwell/board-defs/master/package_musicthing_samd21_index.jsonto “Additional Boards Manager Urls” in the Arduino IDE Preferences to install ‘MusicThing M0 Plus’. - Go to ‘Tools > Board > Boards Manager’ and search for Music Thing. Install “Music Thing SAMD Boards”
- Go to ‘Tools > Board’ and select ‘Music Thing M0 Plus’
- You should now be able to select the 8mu in your ‘Tools > Port’ list as something like /dev/cu/usbmodem14401 (on a Mac) and upload as normal.
- If you want to use the accelerometer or MIDI, install the libraries in the 8mu firmware or the hello world.
- If you have trouble uploading from the IDE, double click the Reset button and mount MTM_BOOT before uploading.
Use Circuit Python with 8mu ←
You can switch between Arduino and Circuit Python easily. Install CP by dropping this Circuit Python firmware .uf2 file onto the bootloader (described below). Switch back to Arduino by installing Arduino code from the IDE. The CP filesystem normally remains in place on the external flash memory.
- Double click the reset button until MTM_BOOT appears
- Drop the MTM M0 Plus Circuit Python .uf2 bootloader into MTM_BOOT
- The device will reboot and CIRCUITPY will appear on your desktop
- You can now drop files into CIRCUITPY as normal (Get started with Circuit Python)
Hello World for Arduino & Circuit Python ←
- Here are two simple Hello World files: a step sequencer that sends USB MIDI to a host, with notes from the fader positions, velocity from the accelerometer and tempo changed by holding buttons on the back.
8mu pinout ←
Reinstall stock firmware ←
- Download the latest firmware version
- Double click the reset button until MTM_BOOT appears
- Drop the latest firmware file (for example 8mu_0_1_5.uf2 ) onto MTM_BOOT
Ideas and Examples ←
- What could you do with a little fader/accelerometer/MIDI box?
- Improve the standard 8mu firmware or the editor, to make it smoother, faster, less irritating, easier to read or just better.
- Add different protocols: high resolution NRPN messages, OSC messages, DX7 weird sysex messages.
- Have the 8mu emulate a QUERTY keyboard that types concrete poetry based on fader settings.
- Use MIDI through to turn the 8mu into a really complicated arpeggiator for hardware synths.
- You can control web pages using Web MIDI - Tutorial from Keith McMillan
- 8mu has a huge 8mb external flash chip, of which less than 200 bytes are used to store banks. You could add lots of preset settings to match MIDI devices, or MIDI songs to play or… something more useful.
- You can play audio through the external MIDI port: The 3.5mm tip is pin 1 (arduino) or board.D11 (python), and the ring is pin 4 / board.D9. Pull the ring low, and send audio data to the tip, and you get (very loud 3.3v) audio output. You could probably generate tones, speech, playback samples from all that flash memory.
- You could send Algorithmic symphonies from one line of code to that audio output.
- Generate MIDI melodies or drum patterns that change based on fader positions or accelerometer readings. Maybe have a look at Tom Johnson’s Self Similar Melodies.
- Rhythm generation: spit out MIDI drum patterns that change with fader or accelerometer positions. There are numerous versions of Euclidean Rhythms on Github in every possible language. I’m also interested in De Bruijn sequences, a different kind of generated binary pattern.
- The BMI160 Inertial Measurement Unit is super capable, including 16 bit accelerometer and gyroscope - it can do things like step and free fall detection. The gestures model in 8mu is very simplistic, and I’m sure it could be made more useful. Datasheet & Arduino Driver
Getting involved and contributing to 8mu ←
- I (Tom Whitwell) am a very amateur, hacky, coder. You can probably do better.
- I’d welcome contributions to develop 8mu.
- Complete alt-firmwares are welcome - share them, let me know at the email below and I’ll share them here.
- Pull requests for the main 8mu firmware are also welcome, although my confidence and capacity in dealing with this stuff is quite low. If you’re interested in getting involved with helping, supporting or developing 8mu, please get in touch.
Troubleshooting a bare board ←
What happens when you connect the board to USB? SCENARIO A:
- LEDS: No Leds Lit
- USB Connection: No folder mounts on desktop
- RESULT: You may have a faulty USB cable, so check that first. Otherwise, the board has no firmware at all, raw chip ❌
- ACTION: Contact Thonk support to ask for help.
SCENARIO B:
- LEDS: Slowly flashing LED next to FADE8
- USB: A folder called MTM_BOOT appears on the desktop
- RESULT: The board has the SAMD Bootloader but nothing else ❌
- ACTION: Drop the 8mu firmware file onto MTM_BOOT
SCENARIO C:
- LEDS: No Leds Lit
- USB: A folder called CIRCUITPY appears on the desktop
- RESULT: The board has the Circuit Python Firmware but no 8mu firmware ❌
- ACTION: Doubleclick the reset button so that MTM_BOOT appears on your desktop, drop the 8mu firmware file onto MTM_BOOT
SCENARIO D:
- LEDS: Flash on power connection, but no random LED flashes
- USB: No folder mounts, Editor page is visible, but every channel is marked “Channel 0”
- RESULT: Circuit Python has not installed the Flash file system ❌
- ACTION: Doubleclick the reset button so that MTM_BOOT appears on your desktop, add the 8mu Circuit Python Firmware. Wait 30 seconds. Doubleclick again, and drop the 8mu firmware onto MTM_BOOT
SCENARIO E:
- LEDS: Flash on power connection, then random occasional LED flashes when board is touched
- USB: No folder mounts on desktop, editor shows editor page
- RESULT: 8mu firmware correctly installed ✅
Getting help ←
- The first place to check for help is this page. It contains pretty much everything I know about 8mu.
- The second place to check is the 8mu Issue List here on Github. Remember to check for closed issues.
- The third way to get help is to walk away - sleep on the problem, write a note to yourself explaining the problem and what you’ve tried. This often helps you find a solution.
- The fourth place to check is the person who sold you your 8mu, particularly if you bought an assembled 8mu from someone.
- Finally, Thonk customers can contact Thonk support to ask for help if you get stuck. If you think it might be a hardware issue, include high resolution photographs of both sides of the PCB.
- Contacting [email protected] or sending Twitter or Instagram DMs is not a good or reliable way to get help.
Release notes ←
Editor:
- 4 May 2023: V2.0.0: Complete rebuild by Tom Armitage, faster and more stable but no new functionality.
- 31 March 2023: v1.0.1:
- Fixes issue when changing banks while in edit mode, where Bank 1 could be read by the editor as another bank number, causing a world of confusion.
Firmware:
- May 2023: v1.0.2
- Fixes a bug (thanks, Marcus) where TRS midi was only sending on Channel 1, ignoring the channel settings from the editor. Hardware midi should now send on the correct channel.
- Fixes some bugs (Thanks, Tom) in the smoothing code on all channels, so faders should settle more confidently, and IMU channels are slightly smoother than they were previously.
- Fixes a rare issue where some boards had stuck or dead faders.
- 31 March 2023: v1.0.1
- Improve the range output by accelerometer / gesture channels, so they can reach 127 and better match the fader channels
Thank you ←
8mu is a very open source project that would not have been possible without the help and support of many people, including: Tom Armitage, Steve, Will Isaacs and everyone at Thonk, Marc Weidenbaum, Mylar Melodies, John Edgar Park, Mark Lentczner, Konstantine Fioretos, Steven Noreyko, Brian Crabtree, Sean Hellfritsch, Brendon Cassidy and the 16n crew, Thea Flowers, the Adafruit family, PCBCart, OSHport, and all the beta testers.