
Radio Music Reference Guide ←
What Radio Music is ←
Radio Music is a 4HP Eurorack sample playback module. It plays audio files from a microSD card, but behaves a bit like a radio: the STATION control moves between files, and in the default mode files keep advancing in the background even when they are not selected.
Radio Music mk2 is a completely revised version of the original 2014 Radio Music with new hardware and firmware. It adds Radio Remote support, higher quality playback, lower latency, larger SD card support, more playback modes, a calibrated 1V/oct pitch input, and no longer depends on the Teensy 3.2.
Front panel controls ←
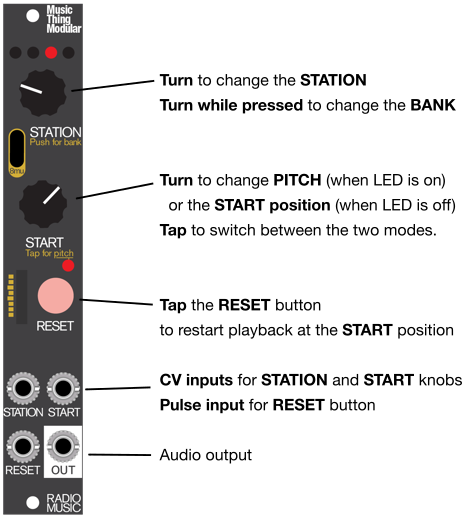
STATION knob and CV ←
The STATION knob chooses the current station: normally an audio file within the selected bank. The STATION CV input can also choose stations.
Hold the STATION knob and turn it to choose a bank from 0 to 15. While a bank is being chosen, the four top LEDs show the bank number in binary.
START knob and CV ←
In the default start mode, the START knob sets the point where the sample begins when it is reset. The START CV input can add voltage control over that start position.
Tap the START knob to enter pitch mode. In pitch mode, the same knob and CV input control playback speed and direction.
RESET button and jack ←
The RESET button restarts the current sample. The RESET jack is normally an input that does the same thing from a rising trigger or gate.
The RESET jack can also be changed into a pulse output using pulseMode.
Radio Remote ←
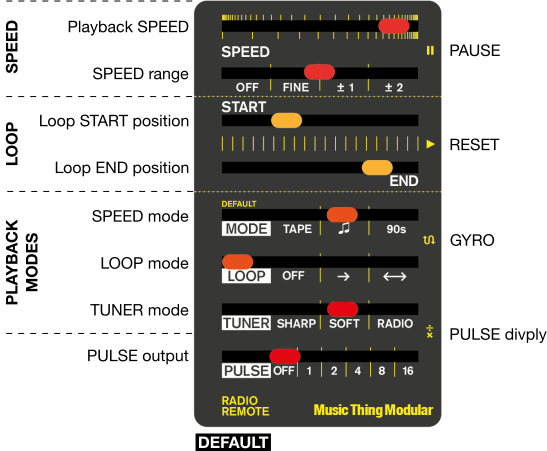
Radio Remote is a Music Thing Modular 8mu with a Radio Remote panel and firmware. It connects to Radio Music using USB-C.
When Radio Remote is plugged in, the START/PITCH knob on Radio Music is ignored. The Remote takes over the performance controls and makes several settings playable without editing settings.txt.
The top four sliders are performance controls:
- SPEED
- SPEED range
- START
- END
The bottom four sliders control settings:
- Speed mode
- Loop mode
- Tuner mode
- Pulse mode
Moving all sliders fully left puts Radio Remote in its default position. The left-most setting labels on the bottom four sliders mean “use the value from the settings file”.
Speed controls ←
The top two Radio Remote sliders control playback speed. The top slider sets speed. The second slider sets the speed range.
Speed range options:
- OFF: play at original speed.
- FINE: plus or minus one semitone.
- +/-1: -1x to +1x in tape mode, or -1 to +1 octave in notes mode.
- +/-2: -2x to +2x in tape mode, or -2 to +2 octaves in notes mode.
In 90s mode, pitch and sample advance rate are controlled separately. The top slider controls advance rate. The range slider becomes pitch.
The pause button between the two speed sliders pauses audio. In tape mode, this behaves like a tape stop/start. In notes mode, audio stops immediately. In 90s mode, the advance rate freezes while the sample continues to play.
The motion button can map the orientation and acceleration of Radio Remote to pitch control, or to pitch and advance rate in 90s mode.
Loop controls ←
The START and END sliders set a loop window. If START is fully left and END is at either edge, or if START and END match exactly, the whole sample plays. For long files, it is often hard to set the sliders close enough to capture a short loop.
If START is to the right of END, playback is reversed.
The RESET button between the START and END sliders restarts the sample from the selected loop point. If that button is held while the START slider is moved, playback scrubs audibly through the sample.
Mode controls ←
Speed mode ←
speedMode sets the way pitch and speed behave:
0: tape mode. Linear speed control, including reverse playback through zero.1: notes mode. Exponential pitch control, by default quantised to semitones.2: 90s mode. Lo-fi timestretch-style playback where pitch and advance rate can separate.
90s speed mode is not available in soft or radio tuner modes.
Loop mode ←
loopMode sets what happens at the end of a file:
0: no loop. Playback stops at the end of the file and waits for a reset, station change or bank change.1: standard looping. This is the default.2: ping-pong looping, alternating forwards and backwards.
Tuner mode ←
tunerMode sets how Radio Music moves between stations:
0: sharp mode. A single station is selected, with short crossfades between stations.1: soft mode. The control fades continuously between adjacent stations, so two samples can play at once.2: radio mode. Analogue radio-style tuning, with stations appearing at particular positions and noise between them.
Sharp mode is the standard Radio Music behaviour and the mode most settings are designed around.
Pulse mode ←
pulseMode changes the RESET jack:
0: RESET is an input. This is the default.- Positive values: RESET becomes a pulse output, producing that number of pulses during one file playback.
- Negative values: RESET becomes a divided pulse output, producing one pulse every N loops.
Pulse outputs are not available in soft or radio tuner modes.
pulseOutDividesCustomLoop = 1 makes the pulse output follow the START/END loop window set by Radio Remote. 0 makes it divide the whole file length.
microSD cards ←
Radio Music stores samples on a microSD card.
Supported card types:
- SDHC cards up to 32GB, formatted FAT32.
- SDXC cards up to 2TB, formatted exFAT.
- MBR boot record.
Unsupported card types:
- Very old SDSC cards up to 2GB.
- SDUC cards above 2TB.
- GPT partitioned cards.
Use a good quality branded card from a reputable supplier. Testing has included SanDisk Ultra, Kingston and Silicon Power cards.
Audio files ←
Supported audio formats:
- WAV:
.wav, uncompressed PCM, 8/11/16/22/44.1/48/88.2/96kHz, 8/16/24-bit, mono or stereo. - AIFF:
.aifor.aiff, uncompressed, 8/11/16/22/44.1/48/88.2/96kHz, 8/16/24-bit, mono or stereo. - RAW:
.raw, interpreted as 44.1kHz, 16-bit mono, as used by the original Radio Music.
If a stereo file is used, the left channel is played.
Banks and folders ←
The simplest card contains audio files in the root directory. This creates one bank.
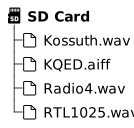
For multiple banks, create folders in the root of the card with names starting from 0 to 15.
Valid bank folder names include:
005 shortwave15 - Koto plucks
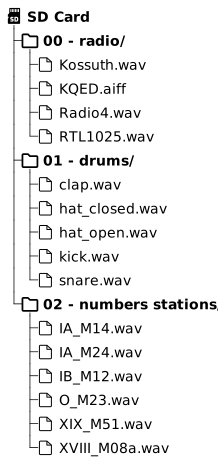
Limits:
- Up to 16 banks.
- Up to 250 audio files in one bank.
- Up to 800 audio files on the card.
- Up to 64 folders.
- Total path length across all indexed files is limited to 80,000 characters.
If any numbered bank folders are present, audio files in the root directory are ignored.
Files and folders are sorted lexicographically. Prefix numbers with zeros if you want numerical order: 02 sorts before 11.
Radio Music ignores files starting with . or _, files without supported audio extensions, and root-level folders that do not start with a number from 0 to 15.
Subfolders ←
Bank folders can contain subfolders. There are two behaviours:
- Sequential subfolders: names ending in
next. - Random subfolders: any other folder name.
In a next folder, files are stepped through in order each time the folder is triggered. In any other subfolder, Radio Music chooses a random file.
Subfolders can be nested.
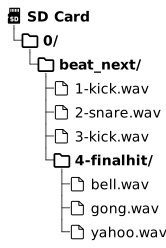
For one-shot sample banks using subfolders, useful settings are:
loopMode = 0
stationPotImmediate = 0
stationCVImmediate = 0
Skipping resets ←
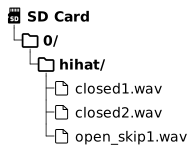
If the last characters in a filename before the extension are skipN, where N is a number from 1 to 255, the next N reset signals are ignored while that file is playing.
For example, a file ending skip1.wav ignores the next reset after it starts.
LED indicators ←
Radio Music uses the row of four front-panel LEDs to show what the module is doing.
There are two more LEDs elsewhere on the panel:
- The RESET LED, next to the RESET button, flashes briefly on each reset and pulses slowly when playback is stopped.
- The PITCH LED, next to the START knob, is lit when the module is in pitch mode and flickers during CV calibration.
The animations below show the four main LEDs.
Normal playback ←
| LED pattern | Meaning |
|---|---|
 |
VU meter. A bargraph of the audio output level. This is the default display during playback. When highQuality is disabled in settings.txt, the VU meter is more digital in appearance to reflect the downgraded sound quality. |
 |
Sample progress bar. When showMeter is set to 2, the LEDs show how far playback is through the current sample. |
 |
Bank number. Shown in binary, with LEDs meaning 8, 4, 2, 1 from left to right, while a new bank is being selected. This can happen by holding the STATION knob and turning, or by long-pressing RESET. The display reverts to the VU meter after a short delay set by meterHide. |
Startup and SD card ←
| LED pattern | Meaning |
|---|---|
 |
No SD card detected. A single LED cycles slowly along the row while the firmware waits for a card to be inserted. Insert or reseat the card to continue. |
 |
SD card mounted, but no audio files found. The same single-LED cycle, running about twice as fast. Check that the card contains valid .wav, .aif, .aiff or .raw files, either in the root directory or in numbered bank folders. |
 |
Scanning the SD card. Shown while the firmware counts folders and audio files. With large numbers of files on a slow card this can take several seconds. Usually it flashes by too fast to see. |
 |
Building file index. A right-to-left fill that shows progress while the file index is built. This is a one-off step done on first power-up with an SD card. |
CV calibration ←
CV calibration mode is entered by holding the START knob while powering up. The module asks you to play a series of 1V/octave reference pitches into the START CV input.
| LED pattern | Meaning |
|---|---|
 |
Entering calibration. All four LEDs flash on and off for two seconds to confirm that the module is in calibration mode. After this the LEDs go dark, then light up one at a time as each octave is successfully captured. |
 |
Calibration succeeded. The same all-LED flash sequence is played after an accurate calibration has been detected. The result is written to flash and the module reboots into normal playback. |
 |
Calibration failed. The four LEDs fade smoothly from full brightness to off. The calibration error was too large, so no calibration data was saved. The previous calibration is retained. Try again, taking care that the START CV input is fed a stable 1V/octave signal. |
Errors ←
| LED pattern | Meaning |
|---|---|
 |
Recovered from a crash. Shown for about two seconds on boot if the firmware crashed and has reset. If this animation ever appears, please report it. |
1V/oct calibration ←
The START CV input can be calibrated for accurate 1V/oct response in 🎵 notes mode.
NB: Calibration means that when the module is in pitch mode, and in notes 🎵 mode it responds to 1 v/oct pitch voltages in the START input. In Tape or 90s mode, voltages in Start input have a much bigger effect, definitely not v/oct.
There are three ways to get into notes 🎵 mode.
- Edit settings.txt in the top level of the SD card to put the whole device into notes 🎵 mode all the time.
- Use the remote control to enter notes 🎵 mode
- Put a settings.txt into any folders that you want to operate in notes 🎵 mode. You just need the line
speedMode = 1in a file called settings.txt in the folder.
To calibrate the START input You need a trusted voltage source that can output steady voltages in the 0-5V range.
- Enter calibration mode by holding START while powering up, or by holding START while removing and reinserting the SD card.
- The four LEDs flash to confirm calibration mode.
- Patch a 1V/oct source into START CV.
- Play the same note across several octaves.
- Each accepted octave lights one LED.
- Calibration needs at least two accepted notes.
- Press RESET to finish, or continue until all five octave ranges have been captured.
If calibration is successful, the result is saved and survives power-off.
If calibration fails, try a different starting note, or calibrate across fewer octaves.
SD card reader mode ←
Radio Music can act as a slow SD card reader. This is useful for editing settings.txt, previewing short audio files and rearranging banks. It is not a good way to copy a whole sample library.
- Hold STATION while powering up, or hold STATION while removing and reinserting the SD card.
- Connect Radio Music to a computer with a USB cable.
- The SD card should appear as a drive.
- When finished, unmount the drive, unplug USB, then press RESET to return to normal operation.
Firmware version and update mode ←
To display the firmware version, hold RESET while powering up or while removing a working SD card. While holding RESET, turn STATION fully left, centre and fully right to select the first, second or third part of the version number. The version is shown in binary on the four LEDs.
To enter firmware update mode:
- Enter firmware version display mode.
- Keep holding RESET.
- Press both STATION and START knobs.
- Connect a computer to the front-panel USB socket.
- A drive called
RPI-RP2should appear. - Drag the Radio Music
.uf2firmware file onto the drive.
settings.txt reference ←
On startup, or when a new SD card is inserted, the RM2 looks for a file called settings.txt in the top-level folder of the SD card, and creates it with default settings if it does not exist.
Each sample bank can have its own settings, controlled by a settings.txt file in the bank folder. Any settings not specified in a bank settings file are inherited from the top-level settings file. This means a bank settings file will often contain only one or two lines — just the settings that differ from the defaults.
File Format
The settings.txt file is made up of lines of the form
<setting> = <value>
where <value> is a whole number.
- Any text on a line after a
#is is ignored - Whitespace is ignored, even within words
- Text is not case-sensitive
This means that
Start Pot immediate = 1 # start knob scrubs through sample
does the same as
STARTPOTIMMEDIATE=1.
The file format and supported values are backwards compatible with settings.txt files written for the original Radio Music (both original 2014 and revised 2017 firmware).
Settings:
This section describes all the setting names and their corresponding values.
The main tunerMode, speedMode, loopMode and pulseMode settings are overridden by the bottom four sliders of the Radio Remote, if these are moved away from their default left-most positions.
Tuner settings:
tunerMode
Sets the way in which the transition between samples occurs as the STATION knob is turned:
0= ‘sharp’: samples switch discretely, crossfading over a time set bycrossfadeTime[default]1= ‘soft’: continuous fading between adjacent samples in the bank. Two samples playing at once2= radio noise emulation mode: emulation of analogue radio tuning, with samples/stations emerging from noise
Sharp tuner mode (tunerMode = 0) is a refinement of the behaviour of the original Radio Music. As the ‘standard’ Radio Music behaviour, it is the mode for which most other settings are optimised.
Radio tuner mode (tunerMode = 2) has several further customisation options:
minRadioStationStrength
In ‘Radio’ tuner mode, sets the minimum strength of distant signals. Range is any integer 0 to 256, where
0= Stations randomly distributed between inaudible and full strength.256= All stations at full strength. At low values ofminRadioStationStrengthmany of the samples in the bank become very quiet and distorted, contributing to the character of the noise as the STATION tuning is adjusted. Default is128.
ssbEffect
Setting to 1 enables an approximate single side band (SSB) pitch shift effect (in truth, closer to ring modulation than true SSB pitch shifting). Default is 0, off.
whistleVol
Volume of heterodyne whistle effect, a sine wave that drops to zero frequency as a station is exactly tuned. Range 0 to 100, default is 50.
noiseVol
Volume of the background noise/hiss in radio tuner mode. Range 0 to 100, default is 50.
Speed/pitch response:
speedMode
The main control that sets the way in which the playback speed of samples occurs:
0= tape mode: continuous linear speed control, including ‘through zero’ speed to backwards playback1= notes mode: exponential pitch control2= ’90s mode: timestretch effect
90s speed mode is not available in the ‘soft’ or ‘radio’ tuner modes.
Speed/pitch response – notes mode:
Pitches from pitch knob and 1 volt-per-octave CV are summed.
pitchKnobMin, pitchKnobMax
Playback speed, in notes mode, at leftmost/rightmost positions of pitch knob. Specified in (integer) semitones. Range -48 to +24.
Default is pitchKnobMin = -12, pitchKnobMax = 12
quantisePitchPot
0= pitch-mode knob is not quantised1= pitch-mode knob is quantised (Does nothing when the Radio Remote is plugged in)
quantisePitchCV
0= 1V/octave pitch-mode CV is not quantised1= 1V/octave pitch-mode CV is quantised
Speed/pitch response – tape and 90s modes
Speeds from pitch knob and CV are summed. If no jack is plugged into the START/Pitch CV jack, only the knob is used.
pitchKnobLinearSpeedMin, pitchKnobLinearSpeedMax
Playback speed, in tape mode and ’90s mode, at leftmost/rightmost positions of pitch knob. Specified in percent of original speed. Range -400 to +400. Default is -100 to +100.
pitchCVLinearSpeedMin, pitchCVLinearSpeedMax
Playback speed, in tape mode and ’90s mode, for min and max CV input (0-5V). Specified in percent of original speed. Range -400 to +400. Default is -100 to +100.
Loop settings:
loopMode
Sets the way in which samples loop.
0= files do not loop. Playback ceases on reaching the end of a file, and is restarted only by changing station/bank, or by a reset.1= files play and on reaching the end loop back to their start point. Unless changed bydisableRadioStart[default]2= ping-pong (boustrophedon) looping; playing alternately forwards then backwards
RESET jack settings:
pulseMode
- When set to
0[default], the RESET jack is an input that retriggers the sample on a rising edge (or pauses the sample, ifresetJackPausesis 1) - When set to a nonzero number, the RESET jack is an output, producing a sequence of pulses synchronised to the sample playback.
- A value of
1outputs a pulse at the start of the audio file - A value greater than
1multiplies the pulse frequency by that number. (2produces one pulse at the start, one half-way through the file,3produces pulses at 0, 33% and 66% of the way through the file, etc.) - A negative value divides the pulse frequency, producing pulses at the start of the file. (
-2produces a pulse every second loop,-3every third, etc.)
- A value of
Pulse outputs are not available in the soft or radio tuner modes.
pulseOutDividesCustomLoop
0= Pulse output locations are relative to the entire length of the current audio file. [default]1= Pulse output locations are relative to the loop selected by the START/END sliders on the Radio Remote
resetJackPauses
0: Rising edge on RESET jack resets audio sample to START position [default]1: High value on RESET jack pauses audio, using the same method as the pause button on the Radio Remote, namely- If
speedMode=0(tape), speed slews to zero - If
speedMode=1(nodes), speed goes to zero immediately, maintaining DC output of signal - If
speedMode=2(‘90s), advance rate is frozen, but playback continues
- If
resetDelay
Sets the delay in µs before responding to a rising edge on the RESET jack. Default = 0µs.
This setting can be useful if the STATION CV and RESET jack are connected to analogue pitch and digital gate signals of a sequencer or CV keyboard. Such devices produce a stepped pitch CV with a gate signal that rises during (or even before) the steps in the pitch CV. Delaying the RESET signal gives the new CV a chance to stabilise before the sample is triggered.
Immediacy options:
Turning a knob or changing a CV input for the STATION, START and pitch controls either update the playback immediately, or only when the sample is reset through the button or RESET jack.
In the default configuration, STATION and pitch controls act immediately, whereas changes of the START position only occur at a reset.
stationPotImmediate
0= Station knob only updated on reset1= Station knob updates immediately (default)
stationCVImmediate
0= Station CV only updated on reset1= Station CV updates immediately (default)
startPotImmediate
0= When in START mode, START knob only updated on reset (default)1= When in START mode, START knob updates immediately
startCVImmediate
0= When in START mode, START CV only updated on reset (default)1= When in START mode, START CV updates immediately
pitchPotImmediate
0= When in Pitch mode, Pitch knob only updated on reset1= When in Pitch mode, Pitch knob updates immediately (default)
pitchCVImmediate
0= When in Pitch mode, Pitch CV only updated on reset1= When in Pitch mode, Pitch CV updates immediately (default)
START response
startCVDivider
Internally, the START position resulting from the knob and CV are represented by 1024 steps covering the entire length of the sample. The START position can be quantised by rounding down the position to the nearest multiple of startCVDivider. For example if startCVDivider = 5 only start positions 0, 5, 10, 15, … are used.
The default value is 2, which compared to a value of 1 reduces the chance of noise causing unwanted restarting of the sample if the START control has immediate response (i.e. if startCVImmediate or startPotImmediate are set to 1).
Large values mean that the sample can only be restarted at discrete points. For example startCVDivider=256 only allows restarts at the start of the file, or at 1/4, 1/2, or 3/4 of the way through. This can be useful for synchronising with drum loops, etc.
Despite its name, startCVDivider applies to the sum of CV and knob positions, not to the CV alone.
radioStart
In the default loop mode 1, controls the behaviour of files when
0= The play position is reset (to a position determined by the start knob/slider and CV) when the STATION is changed.1= The play position in audio files advances even if they are not the selected station (like tuning a radio) [default]
Fade settings:
crossfadeTime
Crossfade time in milliseconds (default = 25ms).
Shorter times lead to faster but potentially ‘clicky’ transition between samples. Longer times (up to 60000ms = 1 minute) are possible, but the ‘soft’ tuner mode is often better suited to such long transitions
fadeMode
Sets the manner in which crossfades and ‘soft’ tunerMode fading occurs:
0= constant power: best for almost all audio signals [default]1= linear: for correlated signals such as wavetables, envelopes, etc.
LED UI options:
showMeter
During playback:
0= show bank number always1= show audio VU meter [default]2= show progress through file (useful for short loops)
meterHide
Even when showMeter is not set to show the bank number, the bank number is displayed while the bank is being changed, and for a short time after. This option sets the time after a bank change for which the bank number remains displayed, in ms. Default = 2000
Misc:
highQuality
0: 8-bit ~20kHz audio with zero-order-hold interpolation. Adds a bit of cheap ’80s sampling grit (aliasing and quantisation noise, smoothed over by an emulated post-DAC filter).1: 24-bit 96kHz audio with cubic interpolation [default]
reselectSubdirOnStationChange
1= sub-folders are reselected on station change.0= sub-folders are reselected only on reset button/trigger
Default settings.txt
# Radio Music v2 settings file


# Loop mode: 0 = files do not loop
#            1 = files loop and play in background (radio mode)
#            2 = ping-pong looping
loopMode = 1


# Crossfade time in ms
crossfadeTime = 25


# Tuner mode: 0 = 'sharp' switch with crossfade
#             1 = 'smooth' continuous fade
#             2 = radio noise emulation mode
tunerMode = 0


# Minimum radio station strength (0-256).
# In 'Radio' tuner mode, sets strength of distant signals.
# 0 = Stations randomly distributed between inaudible and full strength.
# 256 = All stations at full strength.
#
minRadioStationStrength = 128


# Radio mode single side band (SSB) pitch shift effect (0=off, 1=on).
ssbEffect = 0


# Radio mode whistle volume (0-100).
whistleVol = 50


# Radio mode noise volume (0-100).
noiseVol = 50


# Speed mode: 0 = 'tape mode' - continuous linear speed control, including negative speed
#             1 = 'notes mode' - exponential pitch control
#             2 = '90s mode' - timestretch effect
speedMode = 0


# Fade mode: 0 = constant power (best for almost all audio)
#            1 = linear (for correlated signals: wavetables, envelopes, LFOs etc.)
fadeMode = 0


# Pulse out mode: 0 = off (reset in); positive number = multiplier; negative number = divisor
pulseMode = 0


# 0 = Station knob only updated on reset; 1 = station knob updates immediately
stationPotImmediate = 1


# 0 = Station CV only updated on reset; 1 = station knob updates immediately
stationCVImmediate = 1


# 0 = When in start mode, Start/pitch knob only updated on reset; 1 =  knob updates immediately
startPotImmediate = 0


# 0 = When in start mode, start/pitch CV only updated on reset; 1 = CV updates immediately
startCVImmediate = 0


# 0 = When in pitch mode, Start/pitch knob only updated on reset; 1 =  knob updates immediately
pitchPotImmediate = 1


# 0 = When in pitch mode, start/pitch CV only updated on reset; 1 = CV updates immediately
pitchCVImmediate = 1


# Divisor for quantisation of the Start CV and knob:
#  1 = 1024 steps
#  2 = 512 steps
#  3 = 341 steps
#  4 = 256 steps
#  8 = 128 steps, etc.
startCVDivider = 2


# Playback speed, in tape mode and '90s mode, at leftmost/rightmost positions of pitch knob
# Specified in percent of original speed. Range -400 to +400.
# Speeds from pitch knob and CV are summed.
pitchKnobLinearSpeedMin = -100
pitchKnobLinearSpeedMax = 100


# Playback speed, in tape mode and '90s mode, for min and max CV input
# Specified in percent of original speed. Range -400 to +400.
# Speeds from pitch knob and CV are summed.
pitchCVLinearSpeedMin = -100
pitchCVLinearSpeedMax = 100


# Playback speed, in notes mode, at leftmost/rightmost positions of pitch knob
# Specified in (integer) semitones. Range -48 to +24.
# Pitches from pitch knob and 1 volt-per-octave CV are summed.
pitchKnobMin = -12
pitchKnobMax = 12


# Quantise pitch-mode knob to equal-temperament semitones
# 1 = quantise, 0 = no quantise
quantisePitchPot = 1


# Quantise pitch-mode CV to equal-temperament semitones
# 1 = quantise, 0 = no quantise
quantisePitchCV = 1


# LED behaviour: 0 = show bank number
#                1 = show audio VU meter (default)
#                2 = show progress through file
showMeter = 1


# Time after bank change that bank number is displayed (ms)
# Default = 2000
meterHide = 2000


# Audio quality mode: 0 = 8-bit, ~20kHz, zero-order-hold interpolation; 1 = 24-bit, 96kHz, cubic interpolation
highQuality = 1


# 1 = pulse output divides time between 8mu start/end sliders. 0 = pulse output divides entire file length
pulseOutDividesCustomLoop = 1


# 1 = sub-folders are reselected on station change. 0 = sub-folders are reselected only on reset button/trigger
reselectSubdirOnStationChange = 0


# Delay in us before responding to reset jack (0-1000000).
resetDelay = 0


# 1 = reset jack (in input mode) pauses audio while high, instead of resetting on rising edge. Default 0.
resetJackPauses = 0

# 0 = on STATION change, files start playing from START knob+cv position. 1 = radio-style emulation of stations continuing to play while not selected. Default 1.
radioStart = 1